I’ve been wanting to set up recording hardware for the players at my local arcade for a while now. Unfortunately, plugging a few cables into a capture card and calling it a day doesn’t make for a very interesting blog post, so I had to be a bit more creative.
From what I’ve heard, the standard procedure for recording at an arcade is to bring your own capture card, probably a portable one that can record without a PC, and hope that the technicians allow you to go back there and hook it up. Failing that, I suppose you could always angle your phone towards the monitor and record from its camera… but let’s not even go there.
If you’re lucky, there might be capture hardware pre-installed alongside the machine. Can’t say I’ve ever seen any in person, but I’ve heard that the ezcap280HB, or something similar, is a common sight in Japanese arcades. These relatively inexpensive capture cards allow you to plug in a FAT32 or NTFS formatted USB drive and record to it.
Buying and setting one of these up would certainly work, but I’m not too keen on needing to bring your own storage device. I can already see myself forgetting to take it with me before leaving, or forget to start recording, or remove it while it’s still being written to and end up with a corrupted file. There’s also the, admittedly, unlikely risk of damage or theft to worry about.
So, with all that in mind… here was my initial list of goals for this project:
Players should be able to download their videos over local Wi-Fi or the arcade website – no need to plug anything in. I’ll bet more people will be carrying a smartphone than a USB stick nowadays.
Keep physical interaction with the hardware to a minimum. Distribution of the actual video should be easy enough, but controls for starting and stopping the recording will need some further consideration.
After the initial installation, it should “just work” in the background without any manual steps, like needing to be turned on and off every day. Ideally, it would have some way to access it remotely for administration or debugging.
Try not to spend too much money.
That about does it for the introduction, so let’s get straight into it. Here’s the hardware I’ll be working with:
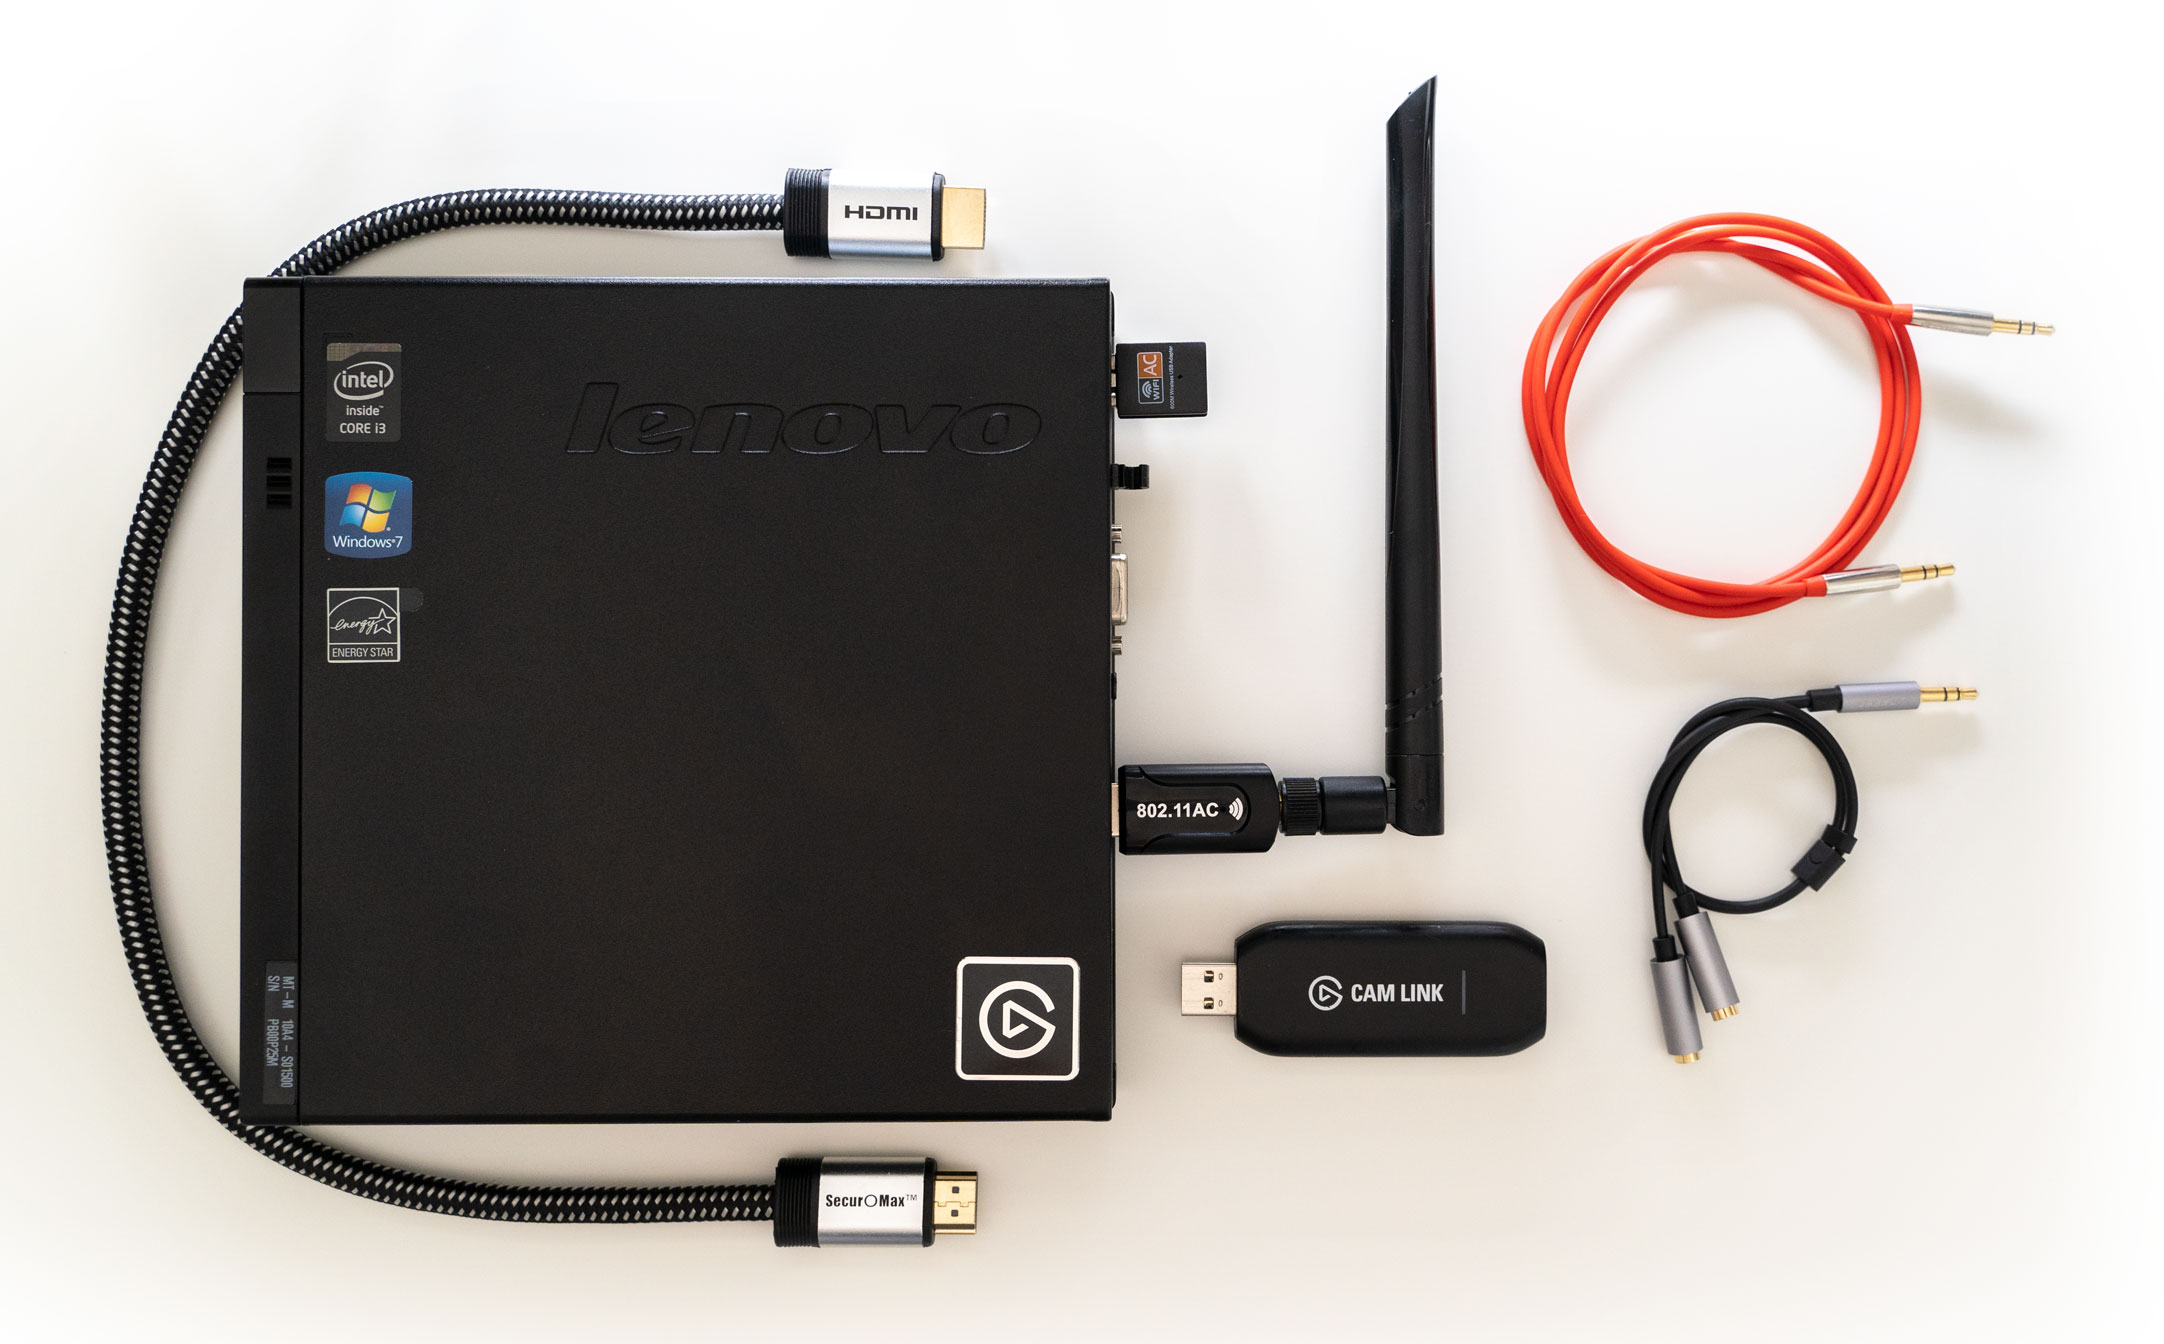
The PC here is a Lenovo ThinkCentre M93 Tiny with an i3-4130T CPU, 4GB DDR3 RAM, and a 320GB HDD. I got mine from eBay for £59.99 a few months ago, but it looks like it’s gone up in price since then. Mine didn’t come with an integrated PCI Wi-Fi card, so I’ve substituted it with an inexpensive USB one instead. More on why that might not have been a good idea later…
Surprisingly, the costliest component here is the capture card, the Elgato Cam Link. Around three years since I bought mine and it still costs £119.99. Unlike most of Elgato’s offerings, the Cam Link and its newer 4K variant are both UVC devices with decent implementations, meaning they can be used on Linux without passing it to a Windows VM or some other workaround.
(I also tried one of those popular unbranded HDMI capture cards as a cheaper alternative. Didn’t expect much, but it actually performed really well. The image quality wasn’t amazing at 720p60, but it would’ve been enough for what I needed. Sadly, it stopped working after just a few days, only drawing power and getting dangerously hot when plugged in.)
Last but not least, a few cables. The HDMI cable connects to one of the video outputs on the cabinet PC. These are pre-configured to clone the same output, so there’s no need to use a splitter. The 3.5mm cable plugs into the line-out port of the cabinet PC and the front line-in port of the recording PC. The 3.5mm Y-splitter is mostly there as a backup in case the port is already in use.
 Plenty of extra space in here.
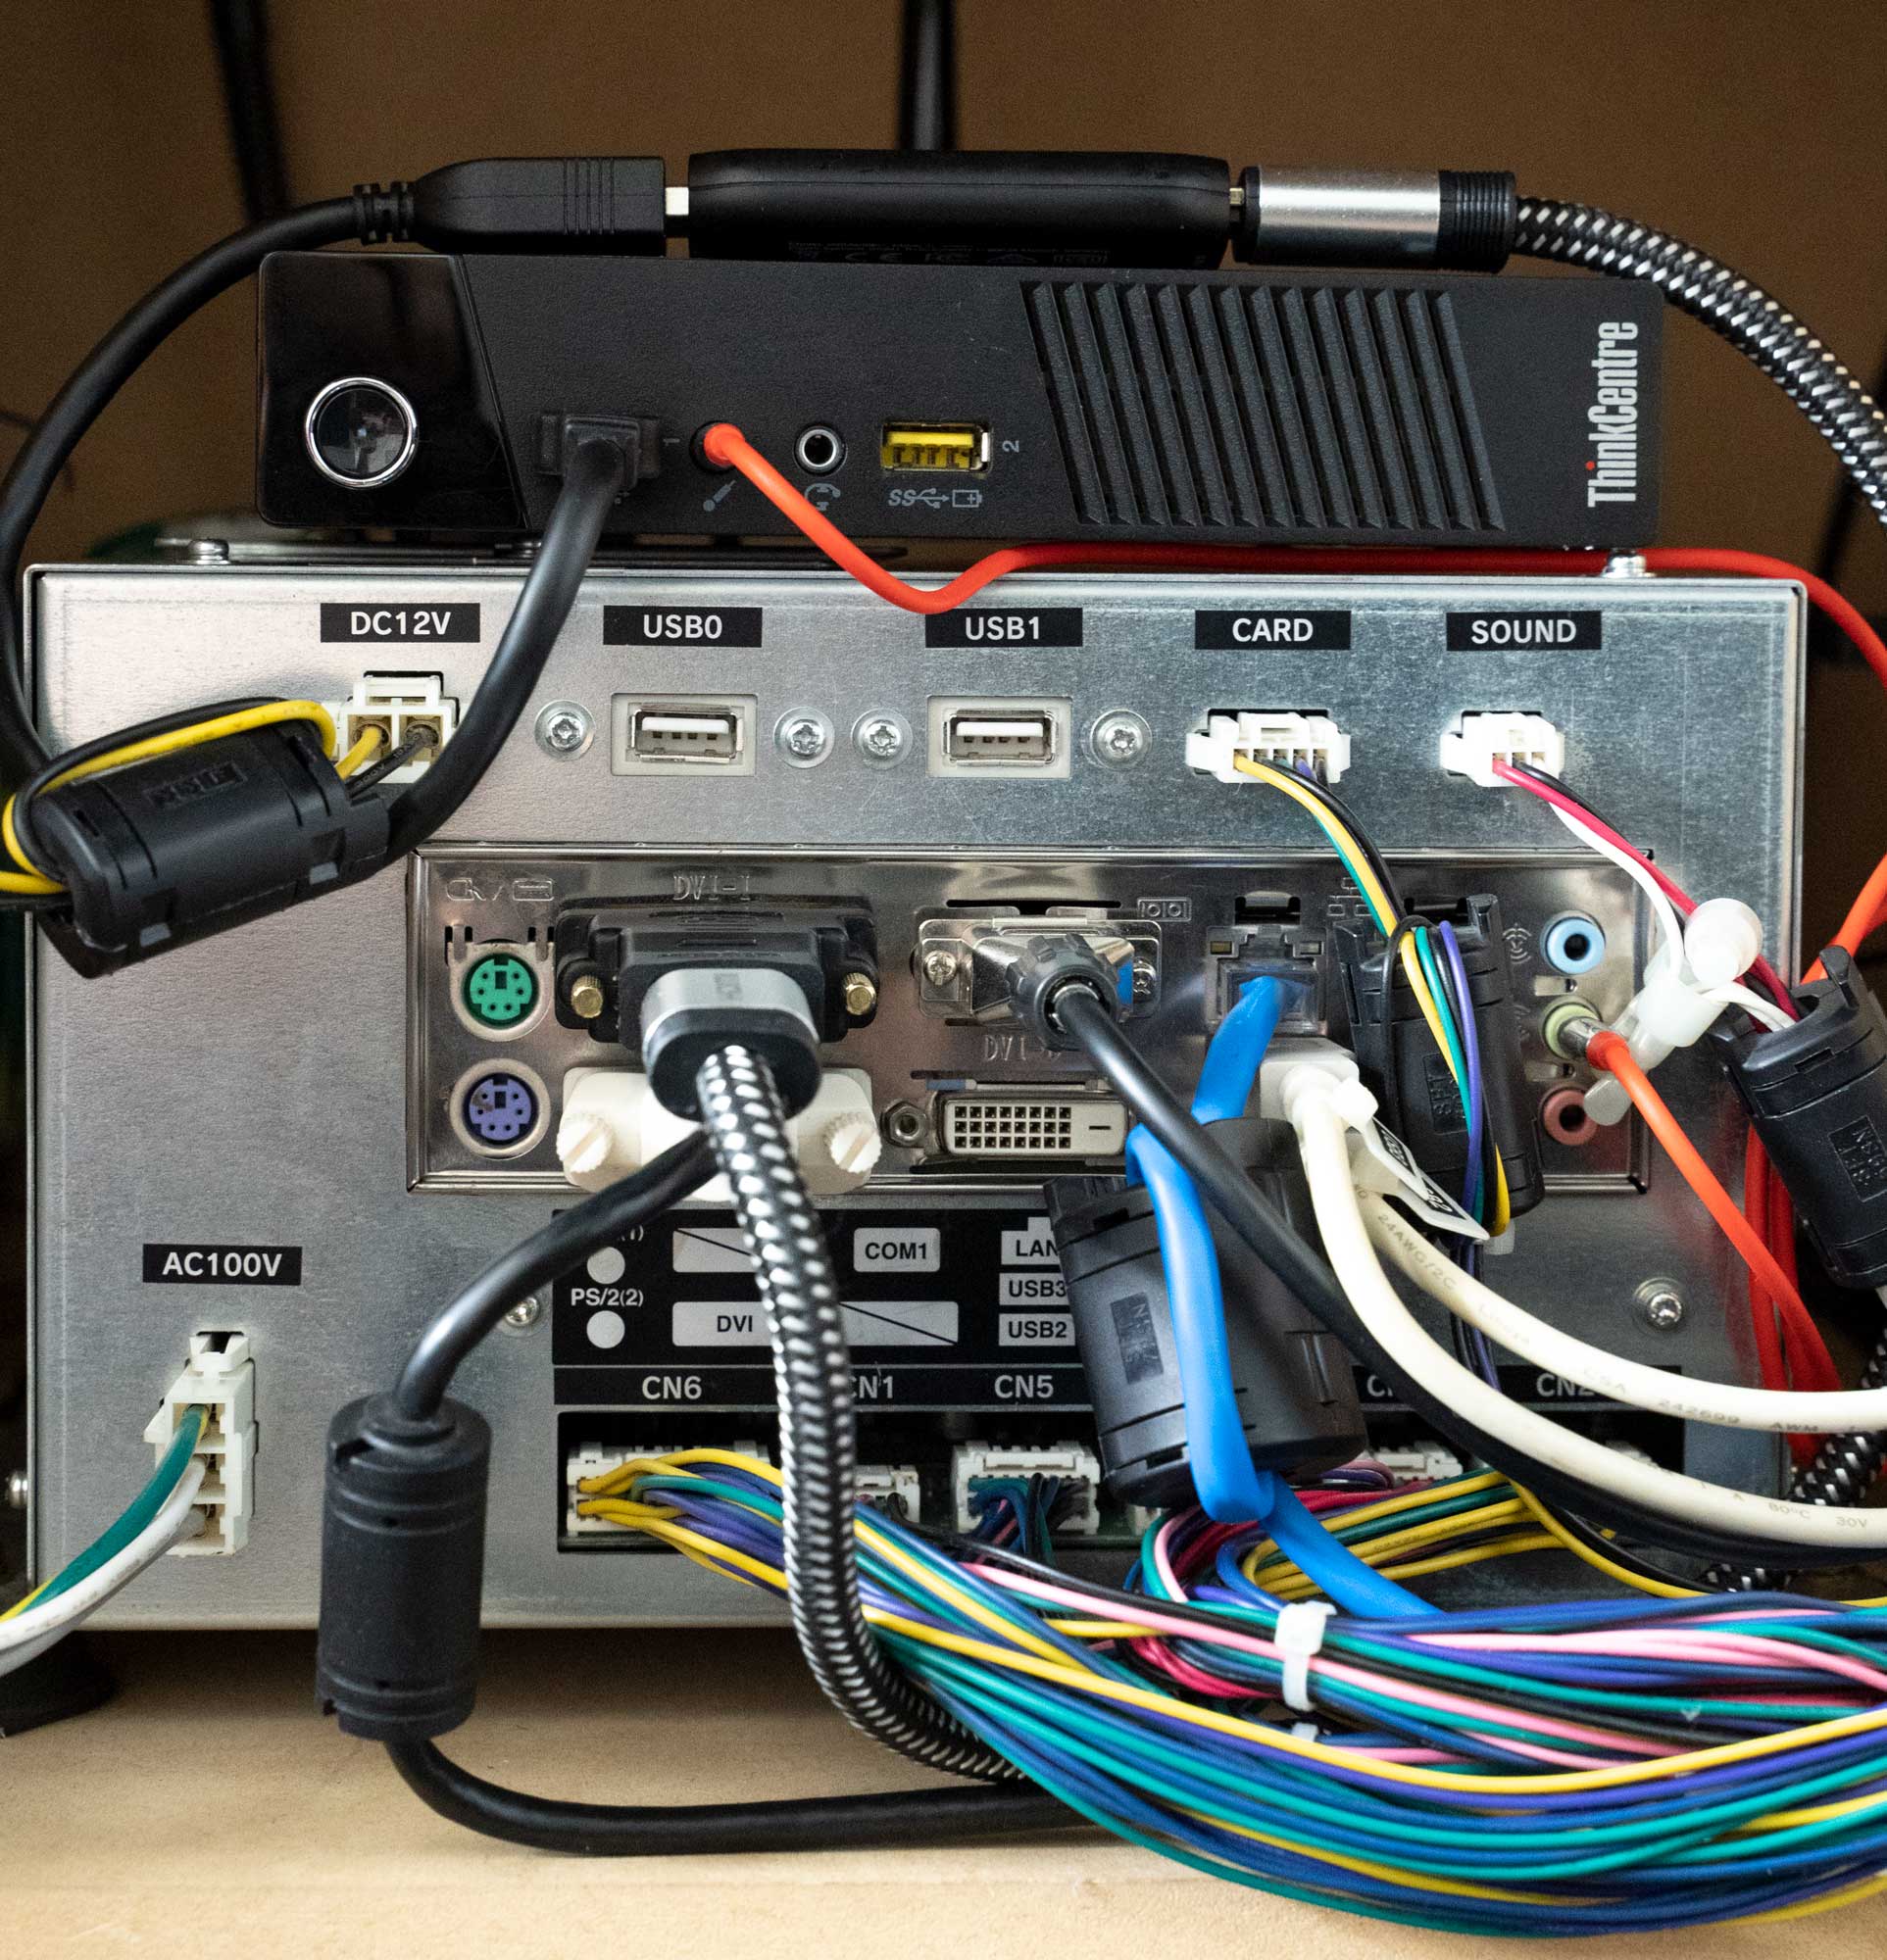
Here’s what it looks like inside my SOUND VOLTEX cabinet. It’s worth mentioning that the recording PC will eventually be hooked up to a beatmania IIDX machine instead, so this is mostly here as a rough idea of what that might look like.
Hopefully, that covers everything for the introduction. First things first, capturing audio & video from “the game”.
Why the suspicious quotation marks? Well… as you might’ve guessed by now, I don’t have a beatmania IIDX machine at home to test with. I’d rather not use a simulator or consumer version of the game as it wouldn’t be an accurate representation of the actual arcade version, so I downloaded a few livestreams from YouTube to play back from my laptop.
Here’s a basic example of recording audio and video to a file with FFmpeg:
ffmpeg -f alsa -i default:CARD=PCH -f v4l2 -r 60 -i /dev/video0 output.mkv
This pulls audio from the on-board ALSA compatible sound card “default:CARD=PCH”, explicitly sets the frame rate of the Video4Linux2 device to 60 FPS, then pulls it in from /dev/video0. Running this produces a single output.mkv file.
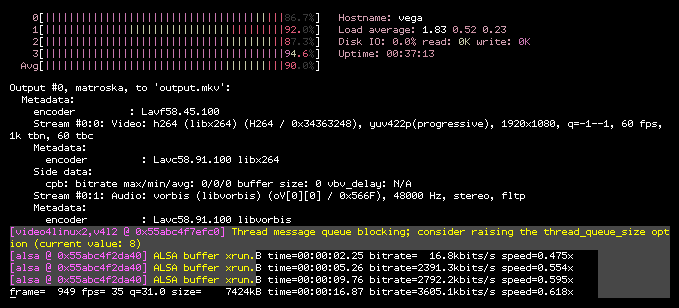 Uh oh.
This is a bit too basic, though. FFmpeg had to come up with defaults for all the options we left out. In this case, it was encoding with libx264 on the CPU, quickly maxing out to 100% usage at only 35 frames per second. Some tweaking is in order.
ffmpeg                                                \
-thread_queue_size 1024                               \
-vaapi_device /dev/dri/renderD128                     \
-f alsa                                               \
-i default:CARD=PCH                                   \
-f v4l2                                               \
-r 60                                                 \
-i /dev/video0                                        \
-vf "hwupload,scale_vaapi=w=1280:h=720:format=nv12"   \
-c:v h264_vaapi                                       \
output.mkv
This revised command uses VA-API instead, allowing FFmpeg to take advantage of Intel Quick Sync, a dedicated hardware core on the CPU for encoding and decoding video. This results in a drastic CPU usage reduction, from 100% to around 10%.
Some more work will need to be done later to hit that perfect balance between file size, device compatibility, and image quality, but this is good enough for now, so let’s move on and consider how to tackle controlling the recording.
My initial thought – as you might’ve guessed if you’ve read any of my other posts – was to find and hook a game function or two. These could be used to send requests over the network to the recording PC, which would start or stop the recording. Honestly… that wouldn’t be very interesting – so it’s a relief that the game data is encrypted and modifying it was off-limits.
Back to the drawing board… what about this method from Amuse Town? A keypad by the cabinet, set to write the last few minutes of recording out to a file on key press. I’m guessing this uses the built-in replay buffer functionality in OBS behind the scenes.
The longest song at the time of writing, “DAWN -THE NEXT ENDEAVOUR-”, is just under two-and-a-half minutes, so a 3-minute buffer, give or take a few seconds to account for load times, would certainly be enough for an entire score to be recorded. One minor inconvenience with this method is that recordings wouldn’t start as soon as the chart is selected. The buffer is always a fixed length, so you would have to crop off some irrelevant stuff from the beginning before posting it online.
Minor issues aside, I’m definitely a fan of this method. But you didn’t see a keypad in that inventory picture earlier, did you?
Exactly. Why not just automate the whole process? Start recording on the ‘decide’ screen, where the song title and chart difficulty is displayed, then stop moments after the result screen starts transitioning back into music select.
After some searching, I came across template matching from the OpenCV library which seemed to be a perfect fit. I exported a few frames from the livestream recording and cut out some of the assets to use as template images. My initial prototype was able to distinguish between all the different screens and simulate an automated recording by starting and stopping a timer.
Unfortunately, this was hardly the fool-proof solution I was hoping for. The music select and decide screens can look completely different in STEP UP mode, CLASS courses, or the extra stage in STANDARD if there’s an ongoing event.
Even the template I was using for the gameplay scene wasn’t reliable, since the tutorial and demo screens were almost identical. I tried to match the TUTORIAL and DEMONSTRATION text but it was starting to get out of hand. It quickly became apparent that I should try to keep the template count to a minimum, and after some iterations I had narrowed it down to three images.

Alright, so here’s the plan: Make a frame analysis program that starts off in an “idle” state. When loaded, it begins to read frames from the capture card. For each frame, it tries to match the “get_ready.png” template. (I picked this text for the template because it doesn’t appear in the tutorial or demo sequences, so we can be certain that we’re recording a real score when we see it.)
Once that’s been found, the program shifts into the “play” state and starts recording. It now begins looking for either the “transition_bg.png” or “failed_bg.png” templates. If it matches the transition screen, the player has already advanced past the result screen and is about to return to music select. This is the signal to stop the recording and publish it.
However, if it matches the STAGE FAILED template, it enters the “failed” state instead. This state is necessary for handling quick retries – where the player can hold the VEFX and EFFECT buttons to try again without going back to the select screen.
In this state, it’s looking for either the “GET READY” text or the transition background. If it sees the former, we can assume that this was a quick retry, discard the previous recording and start again. If it matches the latter, we just stop recording and go back to the “idle” state, looking for the “GET READY” text to start recording again.
There was just one glaring problem with this. Starting the recording when the “GET READY” text appears is… a bit too late. The norm for IIDX videos is to start on, or just before the decide screen. We would need to start about 8 seconds back.
After a lot more trial and error, this was the overhauled recording pipeline I came up with:
ffmpeg                                                \
-vaapi_device /dev/dri/renderD128                     \
-f alsa                                               \
-i default:CARD=PCH                                   \
-f v4l2                                               \
-r 60                                                 \
-i /dev/video0                                        \
-vf "hwupload,scale_vaapi=w=1280:h=720:format=nv12"   \
-c:v h264_vaapi                                       \
-g 60                                                 \
-qp 18                                                \
-c:a libfdk_aac                                       \
-b:a 96k                                              \
-f stream_segment                                     \
-segment_wrap 300                                     \
-segment_time 1                                       \
-segment_list playlist.txt                            \
-segment_list_size 5                                  \
-segment_list_type flat                               \
'%04d.ts'
This command produces a 5-minute-long circular buffer in the “segments” directory. FFmpeg will start at 0000.ts, write one second of audio & video, move on to 0001.ts, write one second of audio & video, and so on. This repeats until the final segment, 0300.ts, where it loops back around to the beginning and starts writing over old segments.
The most important part here is actually the segment_list option, which tells FFmpeg to write to a text file each time it finishes encoding a new segment. Once the recording gets underway, we can read this file to get the filenames of the last 5 segments.
And here’s where the changes to the frame analysis program come in:
Rather than opening /dev/video0 directly, we can now just periodically read from the segment list file for changes. When a new segment is detected, it can be added to a queue for processing. The usual stuff happens here – step through the frames, look for matching templates according to the current state, “start recording”, try to advance to the next state, “stop recording”, etc.
That’s essentially what’s going on at all times. Short 1-second-long video segments are being recorded by FFmpeg and analysed by a separate program. When the final template is matched, the segments that made up that score are combined into a single file.
My final implementation was split up into 3 different services. It follows the outline above, with a few minor additions.
watchdog – A simple Bash script that tries to keep FFmpeg running at all times. Essentially just a wrapper around the command above, but with some error checking and the ability to resume from the last segment instead of starting at 0.
analyze – Writes out a list of filenames when the final template gets matched. The output file is now JSON formatted for ease of parsing and to accommodate for any optional metadata.
frontend – Watches the directory that
analyzewrites to. Parses the JSON recording files and merges the segments into a single video. Also generates a very basic HTML listing page, prunes old videos and generates thumbnails.
When the system boots, all of these services are started automatically. Here’s what that looks like:
$ journalctl -f
systemd[369]: Started A/V ingest service.
systemd[369]: Started Game state analysis service.
systemd[369]: Started Video listing and finalizing service.
analyze[3763]: I:main.cc:18: Using playlist file:    /var/replay/data/segments/playlist.txt
analyze[3763]: I:main.cc:19: Using output directory: /var/replay/data/watch
watchdog.sh[3762]: Using device /dev/v4l/by-id/usb-Elgato_Cam_Link_4K_0002646A08000-video-index0..
watchdog.sh[3778]: [stream_segment,ssegment @ 0x5616353a7940] Opening '0002.ts' for writing
analyze[3763]: I:playlist.cc:41: Added 1 segment to queue.
analyze[3763]: I:context.cc:28: Processing segment '/var/replay/data/segments/0001.ts'..
watchdog.sh[3778]: [stream_segment,ssegment @ 0x5616353a7940] Opening '0003.ts' for writing
analyze[3763]: I:playlist.cc:41: Added 1 segment to queue.
analyze[3763]: I:context.cc:28: Processing segment '/var/replay/data/segments/0002.ts'..
One other thing that I haven’t mentioned yet: The analyze program now keeps track of the last 8 segments it processed.
Now, when analyze advances to the “play” state, it refers back to that list and prepends all of those segments to the beginning of the recording, allowing it to start up to 8 seconds back, which should hopefully put us close to the decide screen.
This isn’t a certainty, though. If you spend a lot of time messing with your HI-SPEED settings then it’ll still start a bit later.
watchdog.sh[3778]: [stream_segment,ssegment @ 0x5616353a7940] Opening '0004.ts' for writing
analyze[3763]: I:playlist.cc:41: Added 1 segment to queue.
analyze[3763]: I:context.cc:28: Processing segment '/var/replay/data/segments/0003.ts'..
analyze[3763]: D:context.cc:85: Added segment '/var/replay/data/segments/0001.ts' to current recording.
analyze[3763]: D:context.cc:85: Added segment '/var/replay/data/segments/0002.ts' to current recording.
analyze[3763]: D:context.cc:85: Added segment '/var/replay/data/segments/0003.ts' to current recording.
analyze[3763]: I:context.cc:57: State updated from 'idle' to 'play'.
analyze[3763]: I:playlist.cc:41: Added 1 segment to queue.
analyze[3763]: I:context.cc:28: Processing segment '/var/replay/data/segments/0004.ts'..
analyze[3763]: D:context.cc:85: Added segment '/var/replay/data/segments/0004.ts' to current recording.
In this instance, I started the test video too early so there were only 3 segments in the “rewind” buffer at the time.
Next, when the player advances past the results screen, the transition template gets matched, ending the recording.
watchdog.sh[3778]: [stream_segment,ssegment @ 0x5616353a7940] Opening '0082.ts' for writing
analyze[3763]: I:playlist.cc:41: Added 1 segment to queue.
analyze[3763]: I:context.cc:28: Processing segment '/var/replay/data/segments/0081.ts'..
analyze[3763]: D:context.cc:85: Added segment '/var/replay/data/segments/0081.ts' to current recording.
analyze[3763]: I:recorder.cc:21: Writing segment list to '/var/replay/data/watch/1609427429.json'.. (26 segments)
analyze[3763]: D:context.cc:95: Cleared 26 segments from recording buffer.
analyze[3763]: I:context.cc:57: State updated from 'play' to 'idle'.
node[3764]: /var/replay/data/watch/1609427429.json
node[3764]: 1609427429 /var/replay/data/output/1609427429.mp4
node[3764]: generating thumbnail from title card segment: /var/replay/data/segments/0063.ts..
The analyze program writes the segment list to a file, then returns to the “idle” state. Rinse and repeat.
It’s also worth mentioning that it marks the segment prior to the one containing the “GET READY” text with ‘thumbnail: true’ as the optional metadata. This is because the song title, artist and genre would still be visible a second earlier, but have already faded out by the time the “GET READY” template is matched.
Finally, the frontend script detects the new JSON file in /var/replay/data/watch, generates a thumbnail for the list page, merges the segments into a single video file, then updates the list HTML which can be statically served by a web server.
Speaking of web servers, it’s time to elaborate on all that Wi-Fi business I mentioned earlier.
Assuming we had a decent upload speed, it would be easy enough to copy the video to some remote server, where it could be listed on some web UI and eventually removed after a certain expiry time. We could even livestream to YouTube if we wanted to!
Of course, that would be too easy. The upload speed at the arcade is abysmal. We don’t measure it in megabytes per second, it’s more like megabytes per minute – so that’s definitely out of the question.
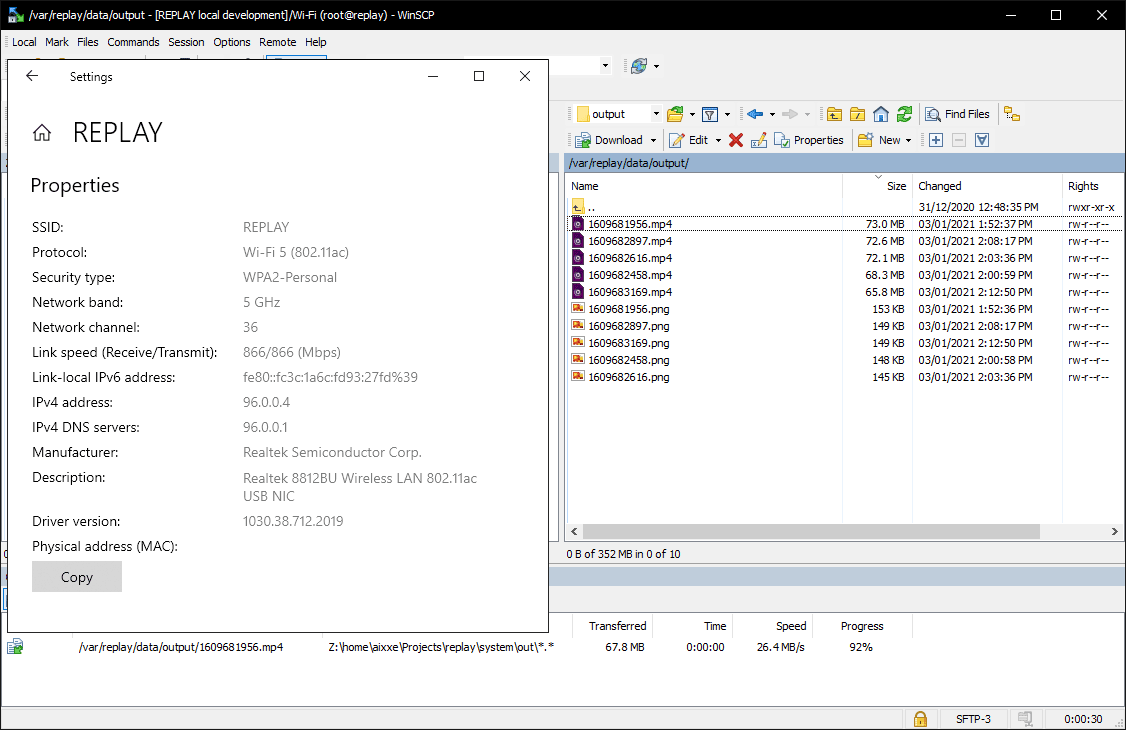
Instead, we’ll be using a combination of hostapd, dnsmasq, and nginx to run our own Wi-Fi network. You would obviously need to be there in person to connect to it, but downloads should be fairly rapid at 802.11ac speeds.
 Fast enough.
hostapd creates and manages the access point, dnsmasq serves as the DNS and DHCP server, and nginx is the web server responsible for serving the video files. There was nothing noteworthy in the setup here, just mostly using the stock configuration.
The real frustration began with the Wi-Fi drivers. You name a problem and I probably encountered it at least once. Sometimes it’d work for an hour or so, then I’d be unable to connect. Sometimes the speed would be good, then gradually slow down to a crawl. Sometimes the device just straight up wouldn’t register on boot – this actually happened consistently after rebooting, which I could occasionally “fix” by resetting the USB device… you get the idea, things just weren’t going well.
Looking back, I probably would’ve saved a lot of time by buying one of the few whitelisted PCI Wi-Fi cards for this PC. Unfortunately, these were only available overseas, and once the international shipping and customs fees were accounted for, it would probably be cheaper to just buy the same PC again but a variant with the integrated Wi-Fi instead.
In the end, I bought a few different cheap Realtek cards, eventually lucking out on this one. It uses the RTL8812BU chipset, which seemed to work best with RinCat’s driver. I don’t know if I’d go as far as to recommend this card, but it worked for me.
Finally, the icing on the cake was to implement a captive portal. If you’ve ever connected to a public Wi-Fi network and had your browser immediately open a login page, that’s a captive portal. There are a few ways to implement one. I used a HTTP redirect.
I already had dnsmasq responding to every DNS query with the recording PC’s IP address, so the only thing left was to configure nginx to redirect to the landing page whenever it received a request to the /generate_204 URL.
server {
    listen              80;
    server_name         _;

    location /generate_204 {
        return          302 http://vega.tv/landing.html;
    }
}
I initially had it redirecting straight to the video listing page, but not all phones allow you to download videos from within the captive portal browser context, so I made a basic landing page with instructions to use a proper browser instead.
As far as core functionality goes, that’s about it!
I know I said earlier that consumer games wouldn’t make for a good test, but I have no idea when the arcades will be open again, so here’s a complete demo of the system running at home on the new version of beatmania IIDX INFINITAS.
All of the recent IIDX games follow the same stage failed screen or transition flow after the song starts, so I only had to swap two of the template images to get this working with INFINITAS. I would’ve shown it running on SOUND VOLTEX, but that earlier picture is a few months old now. I’ve since moved that cabinet into the arcade, so this was the best I could do for a demo.
“Hey wait, Intel NUC? That’s not the PC you showed earlier!”
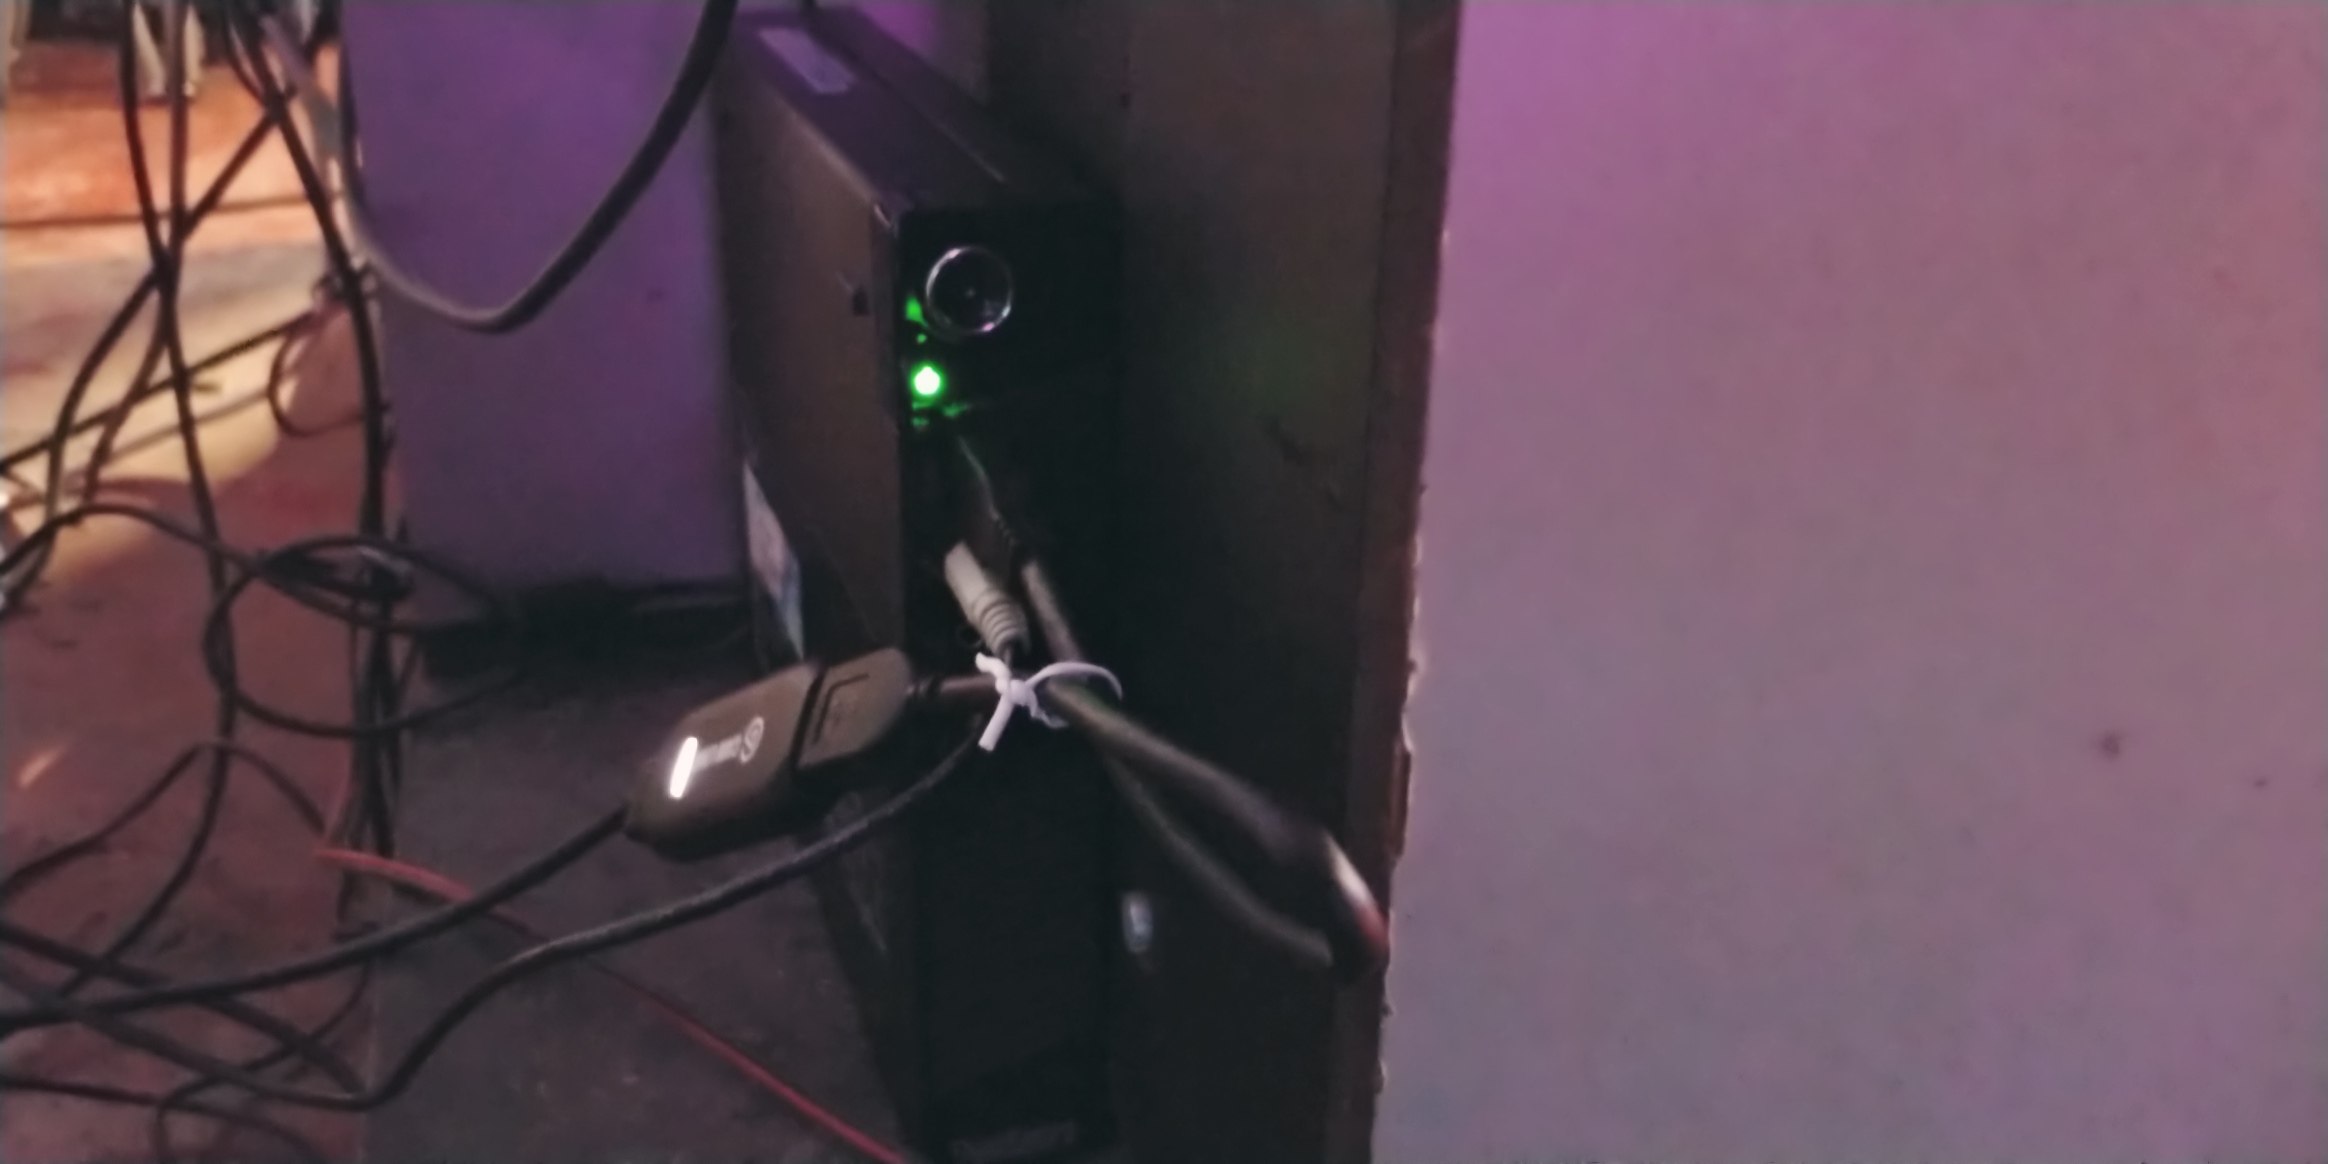
Haha, good observation. To tell the truth, that Lenovo PC is already inside a beatmania IIDX cabinet in London, and has been for a few months. Here’s a really bad phone picture of where we put it for the first “location test” demo.
Anyway, I bought the Intel NUC first and did the initial prototyping on it, but I started to realise it was a bit overkill for this project. Around that time, eBay randomly sent a code for £10 off, leading me to stumble across the ThinkCentre M93.
Both PCs got the job done with plenty of resources left over, so the demo would’ve looked exactly the same on the Lenovo PC.
That about does it for now, though. I hope this made for a somewhat enjoyable read. I was hoping to publish it before 2021, but got caught up with some other projects during the Christmas break. Until next time!