Ever wanted to try out Windows on a virtual private server, but without the additional license fee? You’ve come to the right place. Here’s a guide for installing Windows on KVM-based servers that doesn’t involve dd’ing a shady disk image to your server.
I’ve tested the following instructions with OVHcloud and Linode servers, but the underlying concept should apply elsewhere.
These first few steps will take place on a local Windows machine.
Start with the following, substituting D:\Source for your own base directory:
Create an empty directory at
D:\Source\Boot.Extract your Windows installation image (e.g., Windows Server 2022) to
D:\Source\Windows.Extract either the latest stable or most recent VirtIO drivers ISO image to
D:\Source\Windows\Drivers.
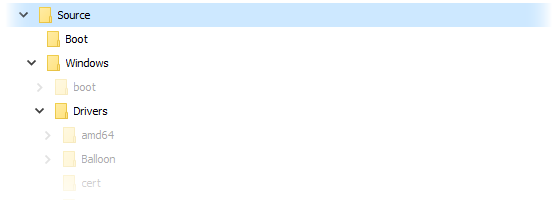
I recommend 7-Zip if you need something to extract .iso files. The directory structure so far should look like this:
There are a couple of drivers that need to be integrated into the Windows Setup image for later.
I’m not sure if this is the case for all OVH servers, so there’s a chance that this step might not be necessary for you. If you don’t see any VirtIO devices when running lspci from your existing Linux install or the rescue system, feel free to skip ahead.
:~ $ lspci
00:00.0 Host bridge: Intel Corporation 440FX - 82441FX PMC [Natoma] (rev 02)
00:01.0 ISA bridge: Intel Corporation 82371SB PIIX3 ISA [Natoma/Triton II]
00:01.1 IDE interface: Intel Corporation 82371SB PIIX3 IDE [Natoma/Triton II]
00:01.2 USB controller: Intel Corporation 82371SB PIIX3 USB [Natoma/Triton II] (rev 01)
00:01.3 Bridge: Intel Corporation 82371AB/EB/MB PIIX4 ACPI (rev 03)
00:02.0 VGA compatible controller: Cirrus Logic GD 5446
00:03.0 Ethernet controller: Red Hat, Inc Virtio network device
00:04.0 SCSI storage controller: Red Hat, Inc Virtio SCSI
00:05.0 Unclassified device [00ff]: Red Hat, Inc Virtio memory balloon
First, open an elevated command prompt and mount the Windows Setup image with Dism.
It’s usually the 2nd image in D:\Source\Windows\sources\boot.wim. Be sure to double-check before mounting.
D:\Source>Dism /Get-ImageInfo /ImageFile:D:\Source\Windows\sources\boot.wim

Deployment Image Servicing and Management tool
Version: 10.0.19041.844

Details for image : D:\Source\Windows\sources\boot.wim

Index : 1
Name : Microsoft Windows PE (amd64)
Description : Microsoft Windows PE (amd64)
Size : 1,877,822,906 bytes

Index : 2
Name : Microsoft Windows Setup (amd64)
Description : Microsoft Windows Setup (amd64)
Size : 2,002,445,523 bytes

The operation completed successfully.D:\Source>Dism /Mount-Image /ImageFile:D:\Source\Windows\sources\boot.wim /Index:2 /MountDir:D:\Source\Boot
Deployment Image Servicing and Management tool
Version: 10.0.19041.844
Mounting image
[==========================100.0%==========================]
The operation completed successfully.Now that the image is mounted, we can integrate any relevant drivers.
D:\Source>Dism /Image:D:\Source\Boot /Add-Driver ^
  /Driver:D:\Source\Windows\Drivers\viostor\2k22\amd64\viostor.inf ^
  /Driver:D:\Source\Windows\Drivers\vioscsi\2k22\amd64\vioscsi.inf

Deployment Image Servicing and Management tool
Version: 10.0.19041.844

Image Version: 10.0.20348.587

Found 2 driver package(s) to install.
Installing 1 of 2 - D:\...\vioscsi.inf: The driver package was successfully installed.
Installing 2 of 2 - D:\...\viostor.inf: The driver package was successfully installed.
The operation completed successfully.D:\Source>Dism /Unmount-Image /MountDir:D:\Source\Boot /Commit
Deployment Image Servicing and Management tool
Version: 10.0.19041.844
Saving image
[==========================100.0%==========================]
Unmounting image
[==========================100.0%==========================]
The operation completed successfully.The installation media is ready now. We’ll come back to this a bit later, but for now, let’s work on the server.
The next few steps will be performed from the rescue system. Once you’ve backed up everything important from your existing Linux installation, head over to the server dashboard and click the “Boot” context menu, then select “Reboot in rescue mode”.
I’ve found the email with the root password can take a long time to arrive, so you might find it faster to expand the “Name” context menu and select “KVM”. It should display the root password above the login prompt.
Once you’ve got it, open your SSH client and log in. We’ll begin by re-creating the partition table. For this, I’ll be using parted. It’s not installed by default, so go ahead and grab it with apt.
:~ $ apt update && apt install parted -yNow we’re good to go. Let’s use lsblk to identify the target disk where we’ll be installing Windows. In this case, it’s /dev/sdb.
:~ $ lsblk
NAME   MAJ:MIN RM  SIZE RO TYPE MOUNTPOINT
sda      8:0    0  2.5G  0 disk
└─sda1   8:1    0  2.5G  0 part /
sdb      8:16   0  160G  0 disk
Now’s your last chance to make sure you’ve backed up anything important, as we’re about to re-partition the entire disk.
We’ll be using the following partition layout:
50MB boot partition – the Windows Boot Manager will be installed here.
30GB system partition – this is where Windows itself will be installed. Can be resized later.
10GB install partition – this will contain the installation media we prepared earlier. Can be removed later.
You can change these around if you want. Aside from the boot drive, the sizes are somewhat arbitrary.
Here’s how to create those partitions with parted:
:~ $ parted --script /dev/sdb \
  mklabel msdos \
  mkpart primary ntfs 1MiB 51MiB \
  mkpart primary ntfs 51MiB 30GiB \
  mkpart primary ntfs 30GiB 40GiB set 3 boot on
If that worked, you’ll be greeted with… no output at all. Run lsblk again and you should be able to see the new partitions.
:~ $ lsblk
NAME   MAJ:MIN RM  SIZE RO TYPE MOUNTPOINT
sda      8:0    0  2.5G  0 disk
└─sda1   8:1    0  2.5G  0 part /
sdb      8:16   0  160G  0 disk
├─sdb1   8:17   0   50M  0 part
├─sdb2   8:18   0   30G  0 part
└─sdb3   8:19   0   10G  0 part
Now to format them.
:~ $ mkfs.ntfs --quiet --quick --label="System Reserved" /dev/sdb1:~ $ mkfs.ntfs --quiet --quick /dev/sdb2:~ $ mkfs.ntfs --quiet --quick /dev/sdb3Windows will be installed on the first two partitions, but the third is our responsibility. That one will contain the installation media we prepared earlier, as we’re going to copy those files to it, boot into it, then continue into Setup from there.
:~ $ mount /dev/sdb3 /mntFor this next step, you’ll need to copy the contents of D:\Source\Windows to the /mnt directory on your server.
This is probably the longest step of this whole process. I’ll be using rsync, but anything will work really.
$ rsync --human-readable --recursive --verbose --compress --progress \
    /mnt/d/Source/Windows/ root@your.server.ip.address:/mnt
Finally, we’ll need something to get us into Setup when we reboot.
Using the ntldr command, GRUB is capable of loading the Windows Boot Manager, so let’s use that.
:~ $ grub-install --target=i386-pc --boot-directory=/mnt --force /dev/sdb
Installing for i386-pc platform.
Installation finished. No error reported.
:~ $ cat << 'EOF' > /mnt/grub/grub.cfg
ntldr /bootmgr
boot
EOFNow we’re ready to install Windows.
:~ $ umount /mntHead back to the server dashboard and select “Reboot my VPS” from the “Boot” context menu. Wait a few seconds, then open the KVM view. If all went well, you should be able to see the Windows logo, followed by the initial setup window.
Don’t continue through Setup just yet!
There’s just one last thing we need to do first. Hold down SHIFT and press F10 to open a command prompt window.
Run diskpart and, when prompted, run the following commands:
(Note: These commands assume you only have one disk, which was partitioned using the layout detailed previously.
If you made any alterations, double-check that you’re selecting the correct thing with ‘list disk’ and ‘list part’.)
select disk 0select part 1active
This will change the active partition to “System Reserved”, rather than the one containing the installation media.
If all went well, you can now close the command prompt and continue through setup as normal. It should do the usual reboot, followed by another reboot, then the out-of-box-experience where you configure your user account.
Once in Windows, log in and open the Device Manager. Double-click any devices that are missing drivers, select “Update Driver”, then browse to the D:\ drive and select the Drivers folder. If your Ethernet adapter was one of these, you should now be online.
After all of your drivers are installed, you can safely open Disk Management and remove the partition containing the install files. With that gone, you can then expand the operating system partition to take up the rest of the disk.
These instructions have been geared towards OVHcloud, but I also signed up for Linode and tested it over there as well.
After creating a new instance, I immediately powered it off.
On the “Storage” tab, I removed the 512 MB swap image, then expanded the main disk to the maximum size.
On the “Configurations” tab, I edited the default configuration to use the “Direct Disk” boot kernel and disabled all of the filesystem and boot helper options – that last part probably isn’t necessary but I doubt they do anything on Windows.
I started the instance in Rescue mode. Unlike OVHcloud, SSH will not start automatically. You’ll need to do it yourself.
Partitioning and copying of install files are the same as detailed above, although my disk was now named
/dev/sda.The rescue system doesn’t come with GRUB, so you’ll need to install it manually with
apt update && apt install grub2.Rebooting in Windows causes the instance to power off instead, so you’ll want to keep the Lassie watchdog enabled.
There’s no
Ctrl+Alt+Delbutton on the Glish UI. Fortunately, you can open a command prompt withSHIFT+F10when it prompts for the initial administrator password. From here, you can openregeditand set “DisableCAD” to1.
That’s all there is to it, I hope it was helpful. Until next time.