Over the years, I’ve received a few questions about how some of my projects, which are usually distributed as standalone DLL files, are able to update themselves while already loaded inside a process. The underlying technique is nothing new and is typically used for malware and other offensive purposes, but there are a lot of innocent practical things you can do with it too.
Let’s start with the fundamentals. You’re familiar with Compiler Explorer, right? Here’s the default square function.
Changes to the source code on the left are automatically compiled and reflected in the output on the right.
No need to touch the code for now, but we do need to make a few changes to the options. First, enable the ‘Compile to binary object’ option in the compiler ‘Output…’ dropdown, then set the ‘Compiler options…’ field to ‘-mabi=ms -Oz’.
The examples in this post will focus on Windows, so we need -mabi=ms to ensure the first parameter is read from the RCX register, rather than the default System V ABI where RDI is used instead. -Oz will more aggressively optimize for smaller code.
We can see the machine code above each instruction now. With optimizations, the entire function compiles to just 5 bytes.
As an initial demonstration, let’s try running this code. From the disassembly, we can see that it operates entirely with registers, so we should be able to copy and paste it anywhere in executable memory, pass an argument in the ECX register, and call it.
No need to open your IDE just yet. It’s a bit of a manual process, but all we need is a debugger like Cheat Engine.
After attaching to a process, select ‘Allocate Memory’ from the Tools menu in the Memory Viewer and jump to the newly allocated region. From here, you can either double-click each empty instruction and copy the mnemonics (e.g. “imul ecx, ecx”), or alternatively, jump to the region address in the hex editor below and paste the raw bytes “0F AF C9 91 C3”.
Once it’s all there, click on the first instruction, set a breakpoint (F5), then select ‘Create Thread’ from the Tools menu. The address should be set to the initial instruction, so continue and enter any number when prompted for the thread argument.
The thread will then be created, which should immediately hit the breakpoint. You should see the number you entered as the argument in the RCX register. Step over to the ret instruction and the squared number will now be present in the RAX register.
Not exactly the most exciting example, but hopefully it gets the idea across. We can write position-independent blocks of C++ code, compile, then run them from anywhere—whether that be our own process or someone else’s.
Let’s step things up a bit. We’ll switch over to local compilation to avoid copying back and forth from Compiler Explorer.
Commands from now on will assume you’re in the CLANG64 shell provided by MSYS2, though most compiler flags should also work with GCC. If you want to follow along in a portable environment, download the latest base archive, extract it somewhere, and run the clang64.exe executable. Once it’s all up and running, grab the necessary packages with the following command:
# pacman -Syu --needed mingw-w64-clang-x86_64-toolchain vim
I should also mention that, while the examples in this post are focused around 64-bit Windows, nothing here is actually exclusive to a specific operating system or architecture. The APIs may differ (e.g. VirtualAlloc vs mmap), but the concepts are the same.
We’ll introduce strings and function calls into our portable code now. Typically, displaying a dialog box goes something like this:
#include <windows.h>

void hello() {
    MessageBoxA(nullptr, "Hello", "Hello, world!", MB_OK);
}
# clang -Oz -c msgbox.cc
Looks like it compiled without error, so we should be able to copy out the bytes like with the square function earlier, right?
Not quite! Including windows.h has only provided us with the prototype of MessageBoxA.
# nm --demangle msgbox.o
00000000 a @feat.00
00000000 T hello()
         U __imp_MessageBoxA
The actual implementation of that function exists in user32.dll, so the compiler creates an undefined (U) symbol. These are typically resolved at link time by matching the symbol to one provided by a linked library—user32.lib in this case. The end result would be an entry for MessageBoxA being created in the import table of our executable.
Unfortunately for us, we’re only compiling the hello function—not linking.
The other issue is with the caption and message strings, which have been moved into the read-only .rdata section. That’s usually a good thing, since .rdata is not executable like .text is, but it’s another problem for us. We’ll need to make some changes…
Remember when Cheat Engine prompted for an argument when starting the thread? Instead of accepting a number to multiply, how about getting the injector code to pass the address of MessageBoxA as it appears in the target process?
As for the strings, it’s rather ugly, but we can apply an attribute to each to ensure they end up in the .text section.
#include <windows.h>

__attribute__((section(".text"))) const char caption[] = "Hello";
__attribute__((section(".text"))) const char text[] = "Hello, world!";

void hello(decltype(MessageBoxA)* fn)
{
    fn(nullptr, text, caption, MB_OK);
}
# clang -Oz -c msgbox.cc

# nm --demangle msgbox.o
00000000 a @feat.00
00000000 T hello(int (*)(HWND__*, char const*, char const*, unsigned int))
00000019 t text
00000027 t caption
No undefined symbols this time. Let’s take a look at the disassembly…
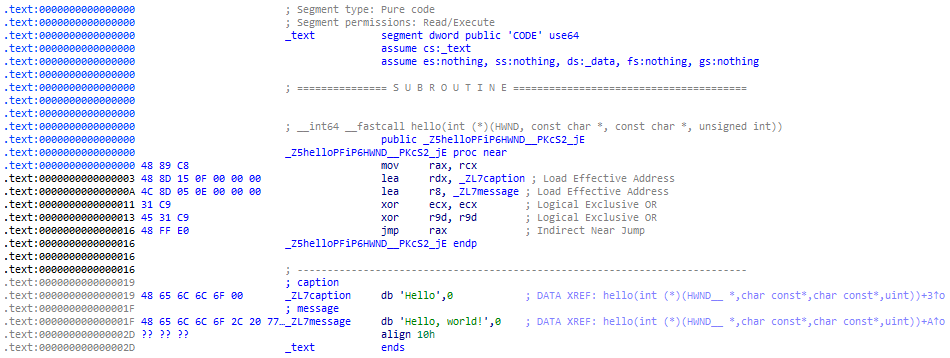
Great! Everything is now neatly contained in the .text section—including the strings, which is… probably not a good idea, but let’s just pretend we didn’t see that. We can easily dump this out to a file with objcopy, then convert it to a C array with xxd.
# objcopy --dump-section .text=msgbox.bin msgbox.o

# xxd -i msgbox.bin > code.h
# cat code.h
unsigned char msgbox_bin[] = {
  0x48, 0x89, 0xc8, 0x48, 0x8d, 0x15, 0x0f, 0x00, 0x00, 0x00, 0x4c, 0x8d,
  0x05, 0x0e, 0x00, 0x00, 0x00, 0x31, 0xc9, 0x45, 0x31, 0xc9, 0x48, 0xff,
  0xe0, 0x48, 0x65, 0x6c, 0x6c, 0x6f, 0x00, 0x48, 0x65, 0x6c, 0x6c, 0x6f,
  0x2c, 0x20, 0x77, 0x6f, 0x72, 0x6c, 0x64, 0x21, 0x00
};
unsigned int msgbox_bin_len = 45;
The generated byte array contains the entire hello function, as well as the caption and message strings.
We could run this with Cheat Engine again, but let’s try to retrace our steps in a small C++ injector program. We need to allocate some executable memory, copy the above byte array into it, then create a thread to run it.
There are a few things that can go wrong with remote code injection, so let’s try running it in a dummy process first.
// run.cc
#include "code.h"
#include <windows.h>

auto main() -> int
{
    auto const memory = VirtualAlloc(
        nullptr,                  // lpAddress
        msgbox_bin_len,           // dwSize
        MEM_COMMIT | MEM_RESERVE, // flAllocationType
        PAGE_EXECUTE_READWRITE    // flProtect
    );

    CopyMemory(memory, msgbox_bin, msgbox_bin_len);

    auto const function = reinterpret_cast
        <void (*) (decltype(MessageBoxA)*)>(memory);

    function(MessageBoxA);
}
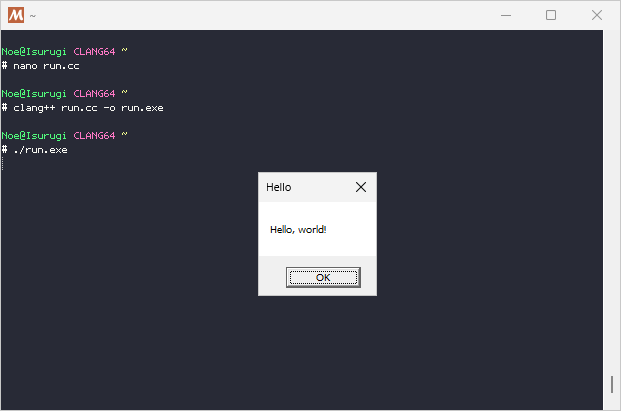
This is probably the most contrived way to call MessageBoxA, but you get the idea. Since we’re copying the code to the same process, we can just immediately cast the memory we allocated to the prototype of the hello function and call it.
# clang++ run.cc -o run.exe
Now we can turn this into something a bit more practical. Let’s run the same code, but from another process.
We’ll add in tlhelp32.h to iterate loaded modules in the remote process.
// inject.cc
#include "code.h"
#include <windows.h>
#include <tlhelp32.h>
Now onto the main implementation. As always, we’ll be leaving out a lot of error checking and handle… handling for the sake of brevity. This new program—let’s call it inject.exe—will expect the target process ID as the sole argument.
if (argc != 2)
    return EXIT_FAILURE;

auto pid = strtoul(argv[1], nullptr, 10);
We’ll need to find the base address of user32.dll from the module list of the remote process. By the way, there’s no guarantee it’ll be loaded, especially for things like console applications. There are ways around this, but we’ll get to that later.
auto user32 = [] (auto snapshot) -> PBYTE
{
    auto entry = MODULEENTRY32 { .dwSize = sizeof(MODULEENTRY32) };
    Module32First(snapshot, &entry);

    do
        if (stricmp(entry.szModule, "user32.dll") == 0)
            return entry.modBaseAddr;
    while (Module32Next(snapshot, &entry));

    return nullptr;
} (CreateToolhelp32Snapshot(TH32CS_SNAPMODULE, pid));

if (!user32)
    return EXIT_FAILURE;
The location of user32.dll varies from process to process, but the relative offset to the MessageBoxA function should be the same. We take a shortcut here by using the address from our injector process to calculate the final remote one later.
auto base = LoadLibraryA("user32.dll");
auto rva = PBYTE(GetProcAddress(base, "MessageBoxA")) - PBYTE(base);
With that, we have all we need to copy the code and execute it. Let’s start by opening a handle to the process.
auto process = OpenProcess(PROCESS_ALL_ACCESS, FALSE, pid);
Next, allocate some executable memory and copy the pre-compiled code into it.
auto memory = VirtualAllocEx(
    process,                         // hProcess
    nullptr,                         // lpAddress
    msgbox_bin_len,                  // dwSize
    MEM_COMMIT | MEM_RESERVE,        // flAllocationType
    PAGE_EXECUTE_READWRITE           // flProtect
);

WriteProcessMemory(
    process,                         // hProcess
    memory,                          // lpBaseAddress
    msgbox_bin,                      // lpBuffer
    msgbox_bin_len,                  // nSize
    nullptr                          // lpNumberOfBytesWritten
);
Fun fact: We could allocate with the more proper PAGE_EXECUTE_READ page protection, as calling WriteProcessMemory will automatically make it writeable on our behalf, then set it back to execute & read-only afterwards.
Finally, create a new thread in the remote process. Once started, it’ll begin executing from the first instruction of our hello function. The parameter to the function is set to user32 + rva, which is the base address of user32.dll in the remote process, plus the relative virtual address to MessageBoxA we calculated from our own process.
CreateRemoteThread(
    process,                         // hProcess
    nullptr,                         // lpThreadAttributes
    0,                               // dwStackSize
    LPTHREAD_START_ROUTINE(memory),  // lpStartAddress
    user32 + rva,                    // lpParameter
    0,                               // dwCreationFlags
    nullptr                          // lpThreadId
)
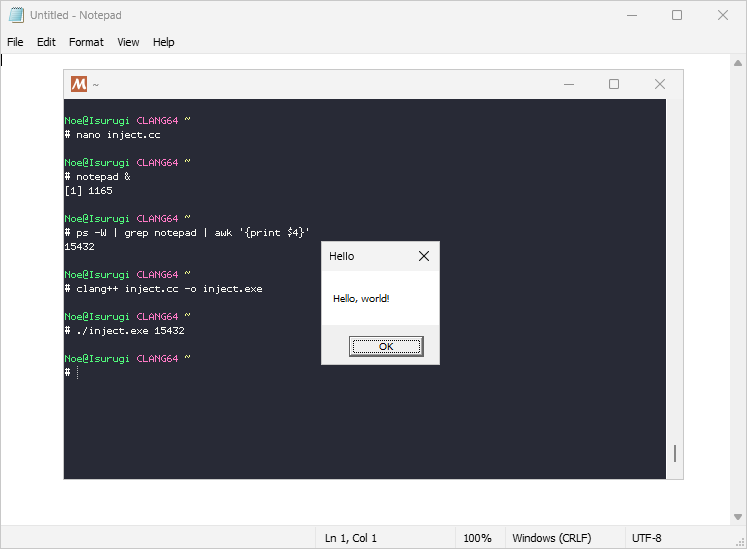
Running inject.exe <pid> should display the same dialog box as before, but now originating from the target process.
In case you were wondering, it is possible to do this without having the injector pass the address of MessageBoxA. It’s mostly useful for writing shellcode—so a bit out of scope for our use case—but I wrote a simple example over here if you’re curious.
Hopefully that covers the core concepts. For our last exercise, let’s build that self-updating .dll I mentioned earlier.
Allow me to set the scene. Our library is going to be loaded into a dummy executable like so:
// host.cc
#include <windows.h>

[[noreturn]] int main()
{
    LoadLibraryW(L"library.dll");

    while (true)
        Sleep(1000);
}
This host executable serves as the target we want to run our code from. Our library would typically be loaded with some injector program or a proxy library but, for demonstrative purposes, the host is kind enough to do it for us here.
But that’s all the help we’re going to get. Remember that our library is distributed as a single .dll file and nothing else. All of our updating code has to be inside the library, and the library is already loaded… so what do we do now?
Actually, let’s look at it a different way. Imagine we had a second library, updater.dll. Now how would we handle the update?
Perhaps this theoretical library could export a QueueUpdate function that takes 2 arguments: a full path to the currently loaded version of library.dll and a full path to the new version—let’s say library.dll.new—that will replace it.
There are plenty of ways to implement such a function, such as passing the library.dll module handle as an additional argument and waiting for it to become invalid—indicating the library has been unloaded—but one of the easiest methods I can think of would be to start a background thread that periodically calls MoveFileEx and checks for a successful return code.
The implementation for that QueueUpdate function might look something like this:
void QueueUpdate(wchar_t* src, wchar_t* dst)
{
    do
        { Sleep(100); }
    while (MoveFileExW(src, dst, MOVEFILE_REPLACE_EXISTING | MOVEFILE_WRITE_THROUGH) == 0);

    LoadLibraryW(dst);
}
We can’t replace the .dll while it’s still mapped in the process, so this will continue to loop until library.dll unloads itself by calling FreeLibraryAndExitThread. Once it’s unloaded and the file handle is closed, the move operation will succeed.
After that, all that’s left is to load the library—now the updated version—into the process again with LoadLibrary.
This is possible because the code for the QueueUpdate function exists in updater.dll, which remains loaded during the entire update procedure. Meanwhile, all the code in library.dll is unmapped during the while loop.
Here’s where we can apply what we’ve already learned. We don’t need a separate updater.dll, we just need to make the QueueUpdate function outlast our library by making a copy of it in the process before unloading.
That said… we have a few new issues to contend with.
For one, it expects two arguments for paths but CreateThread will only let us specify one. Even worse, there are 3 calls to Windows functions in there, so we’d actually need to pass 5 things when we start the thread. Unless…?
// context.h
#pragma once

#include <windows.h>

struct context
{
    decltype(Sleep)* Sleep;
    decltype(MoveFileExW)* MoveFileExW;
    decltype(LoadLibraryW)* LoadLibraryW;

    wchar_t old_path[MAX_PATH];
    wchar_t new_path[MAX_PATH];
};
Stuff it all into a structure! Now we pass a pointer to a context object instead. Here’s the adapted function:
// updater.cc
#include "context.h"

DWORD WINAPI entrypoint(context* ctx) // LPTHREAD_START_ROUTINE
{
    do
        { ctx->Sleep(100); }
    while (ctx->MoveFileExW(ctx->new_path, ctx->old_path,
        MOVEFILE_REPLACE_EXISTING | MOVEFILE_WRITE_THROUGH) == 0);

    ctx->LoadLibraryW(ctx->old_path);

    return 0;
}
Nothing new here. We follow the same steps to compile as we did in the previous example.
# clang++ -Oz -c updater.cc

# objcopy --dump-section .text=updater.bin updater.o

# xxd -i updater.bin > updater.h
Okay, now for the main library code. Here’s the initial file skeleton:
// library.cc
#include <print>
#include <fstream>
#include <filesystem>

#include <windows.h>

#include "context.h"
#include "updater.h"

auto WINAPI init(LPVOID self) -> DWORD
{
    // all code from this point on goes in here
}

auto WINAPI DllMain(HINSTANCE instance, DWORD reason, LPVOID) -> BOOL
{
    if (reason != DLL_PROCESS_ATTACH)
        return TRUE;

    CreateThread(nullptr, 0, init, instance, 0, nullptr);

    return TRUE;
}
Did you notice our library doesn’t export anything? This is one of the pitfalls of updating like this. It’s going to be unloaded if an update is available, so it’d be a recipe for disaster if any other libraries tried to call or use anything from it.
In a sense, our library is more like an executable. It gets loaded into the process and goes off to do its own thing. We spawn a thread in DllMain so we can continue initializing and look for updates without worrying about loader lock.
First things first: we have to check if the library was just updated and, if it was, don’t attempt to update again.
// check if we should update
if (std::filesystem::exists(".has_updated"))
{
    // update again on next run
    std::filesystem::remove(".has_updated");
    std::println("[{}] updated from {}!", THIS_LIBRARY, NEXT_LIBRARY);
    std::exit(0);
}
This is just to avoid getting stuck in an infinite loop of updating for our demo. This is probably where you would do an external API call to some updater endpoint and compare your local version against the latest remote one.
If the local version is outdated, download the latest one and write it to disk as library.dll.new. Of course, you should be sure to verify the downloaded file first. I also recommend signing your updates too, but I digress.
std::println("[{}] updating into {}...", THIS_LIBRARY, NEXT_LIBRARY);

auto const source = std::filesystem::absolute("library.dll");
auto const target = std::filesystem::absolute(NEXT_LIBRARY);
auto const destination = std::filesystem::absolute("library.dll.new");

std::filesystem::copy_file(target, destination);

{ std::ofstream { ".has_updated" }; } // prevent infinite update after reload
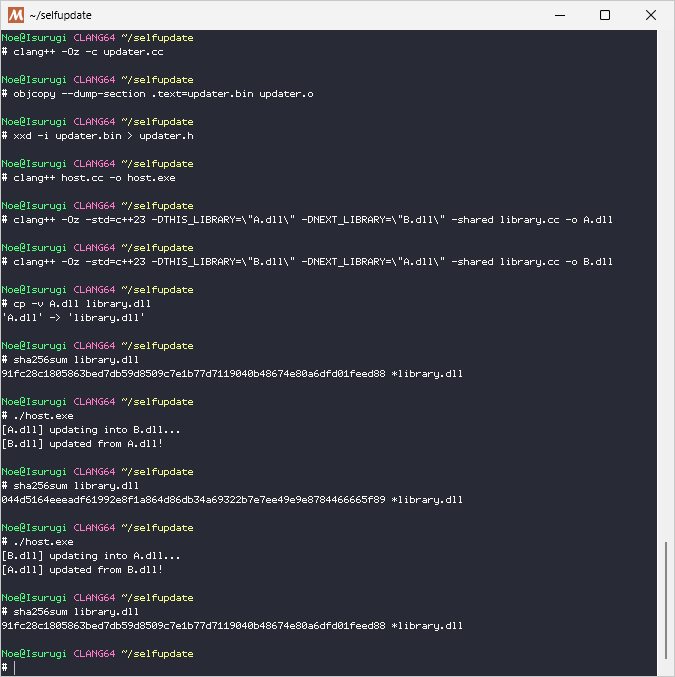
No servers necessary for our example. We’ll just have two files: A.dll and B.dll.
The only difference between these will be the values of the THIS_LIBRARY and NEXT_LIBRARY macros. A.dll will update into B.dll, while B.dll will update into A.dll. As a result, every time we call host.exe the libraries will be swapped.
auto const ctx = static_cast<context*>
    (HeapAlloc(GetProcessHeap(), HEAP_ZERO_MEMORY, sizeof(context)));
Now that we’re dealing with a structure, the usage is a little different to our previous example.
Previously, we passed the address of MessageBoxA, but now we’ll need to pass a pointer to some data. The data has to stick around after our library is unloaded too, so we’ll allocate it on the default process heap using the HeapAlloc function.
ctx->Sleep          = Sleep;
ctx->MoveFileExW    = MoveFileExW;
ctx->LoadLibraryW   = LoadLibraryW;

std::format_to(ctx->old_path, L"{}", source.wstring());
std::format_to(ctx->new_path, L"{}", destination.wstring());
Our updater function calls a few Windows functions, so we need to copy pointers to them into the context object. We also make copies of the path to the current library and the path to the library that will be replacing it.
auto const code = VirtualAlloc(nullptr, updater_bin_len,
    MEM_COMMIT | MEM_RESERVE, PAGE_EXECUTE_READWRITE);

CopyMemory(code, updater_bin, updater_bin_len);
One final allocation for the updater code…
auto const entrypoint = reinterpret_cast<LPTHREAD_START_ROUTINE>(code);

CreateThread(nullptr, 0, entrypoint, ctx, 0, nullptr);
FreeLibraryAndExitThread(static_cast<HINSTANCE>(self), EXIT_SUCCESS);
…and we’re ready to go!
# clang++ host.cc -o host.exe

# clang++ -Oz -std=c++23 -DTHIS_LIBRARY=\"A.dll\" -DNEXT_LIBRARY=\"B.dll\" -shared library.cc -o A.dll

# clang++ -Oz -std=c++23 -DTHIS_LIBRARY=\"B.dll\" -DNEXT_LIBRARY=\"A.dll\" -shared library.cc -o B.dll

# cp -v A.dll library.dll
'A.dll' -> 'library.dll'

# ./host.exe
I’ve posted a more polished version over on GitHub here. It’s mostly the same as this one, but the updater code is re-compiled automatically with CMake, and the memory allocated for the update is cleaned up afterwards.
I hope you’ll have as much fun as I did when I first learned about this stuff. It’s about time for me to get back to my next project, which happens to use some techniques from this post. It’ll be on GitHub soon if you want to see more. Until next time.