I recently finished writing a Discord bot to play audio and video from YouTube, Twitch, and various other sources. It’s not all that efficient, reliable, or even terms-of-service-legal, but it was fun to build, and hopefully this post will inspire someone to make something better so I can switch to using that instead.
As far as I could tell from skimming documentation and various libraries, Discord bots can transmit audio in voice channels, but can’t screen share or stream from a camera. So, for this to work, we’re going to use a regular user account instead. Most libraries should work the same whether you use a bot token or a regular user one but, fair warning, this is probably not a good idea.
With that disclaimer out of the way, this bot is written in Node.js with the discord.js library – specifically an older v11.x version, since using a non-bot token on newer releases seems to always result in an ‘invalid token’ error. This is used to receive and handle command messages, then delete them to avoid cluttering the channel.
To actually stream the audio & video, I’m using Puppeteer – a library for programmatically controlling a browser.
In this case, the browser opens to Discord’s web application, looks for a unique element selector belonging to the voice channel, then simulates a click event to join it. When it’s time to start playing a video, the browser clicks the “Video” button.
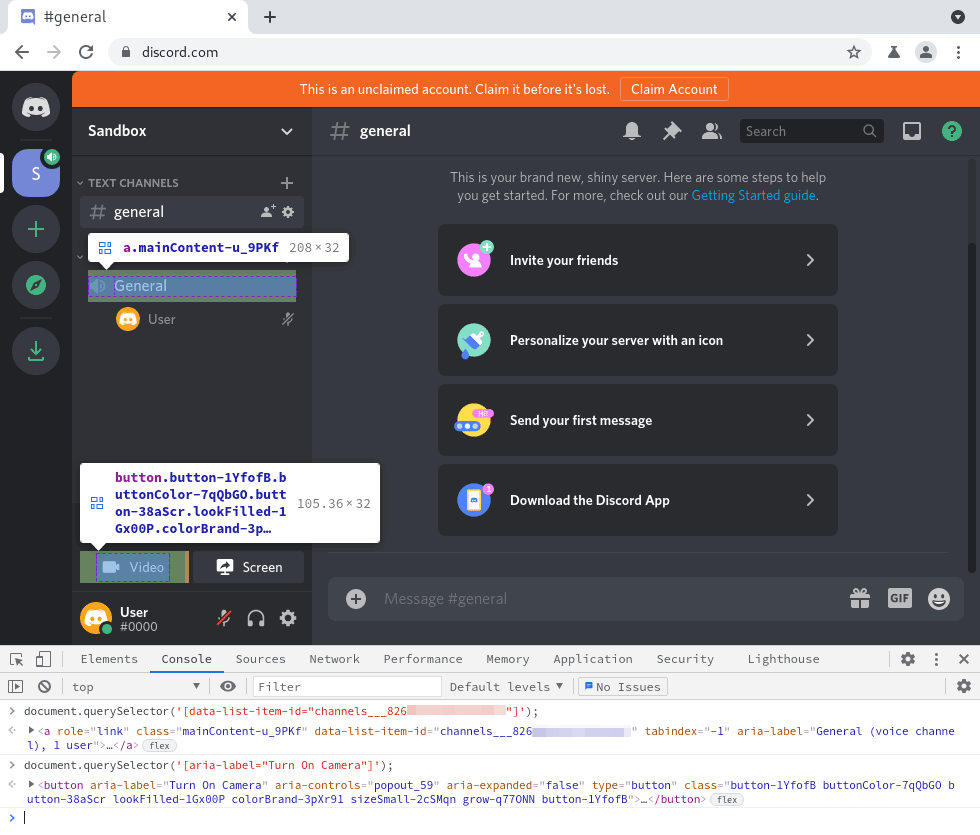
This starts transmitting audio and video in the channel from two loopback devices, both of which are being written to by ffmpeg, using youtube-dl as the input. Once the video is finished, or is interrupted by the “.stop” command, the “Video” button is clicked again, disabling it until the next video is ready to be played.
Sounds a bit convoluted, but you can put it all together in around ~150 lines of code.
To start, we’ll need to load the snd-aloop and v4l2loopback kernel modules. These provide the two devices that the browser will read from and our script will write to. Arch Linux ships with the former and provides the latter in the community repository as a DKMS module, meaning we’ll only need the headers for the current kernel before installing it.
We’ll also need to install GStreamer and a few plugins in order to manage some of the video device settings.
# pacman --needed -S ffmpeg gst-plugins-base gst-plugins-good v4l2loopback-dkms linux-headers
With that, we can now load the modules into the kernel. If you wanted to do this automatically on boot, you could create files in the /etc/modprobe.d and /etc/modules-load.d directories, but I prefer to only keep stuff loaded while I’m using it.
# modprobe snd-aloop pcm_substreams=1
# modprobe v4l2loopback exclusive_caps=1
Before we use the devices, ensure the UNIX user that will run the bot has permission to do so:
# usermod -a -G audio,video aixxe
$ id
uid=1337(aixxe) gid=1337(aixxe) groups=1337(aixxe),985(video),995(audio)
We also need to set a few things on the video device before we start the browser. I’ll be using device names as they appeared on my machine from this point on. You’ll probably need to adjust these if you have a real sound card or any video devices attached.
The following commands should be run once before the bot starts:
# v4l2loopback-ctl set-caps 'video/x-raw, format=RGB, width=1280, height=720' /dev/video0
# v4l2-ctl -d /dev/video0 -c timeout=3000
This instructs the device to accept 1280x720 RGB video, and to start sending null frames after 3 seconds of missing input. Feel free to adjust the format to your liking. I’m sure there are better options out there, this was just the first one I tried that worked.
The timeout part is important because Discord will automatically disable the camera until it starts to detect input again. Initially, this was a nice unintended feature, as I didn’t have to turn the video on and off manually, but it always took a while after the video had started playing before Discord re-activated it, so you’d always miss out on the first few seconds.
Last but not least, we have to write video to the device. In this case, a second of an FFmpeg test source. This is a bit strange compared to the other commands, but Chromium won’t detect the camera until something has written to it at least once.
$ ffmpeg -re -f lavfi -i testsrc=duration=1:size=1280x720:rate=30 -pix_fmt rgb24 -f v4l2 /dev/video0
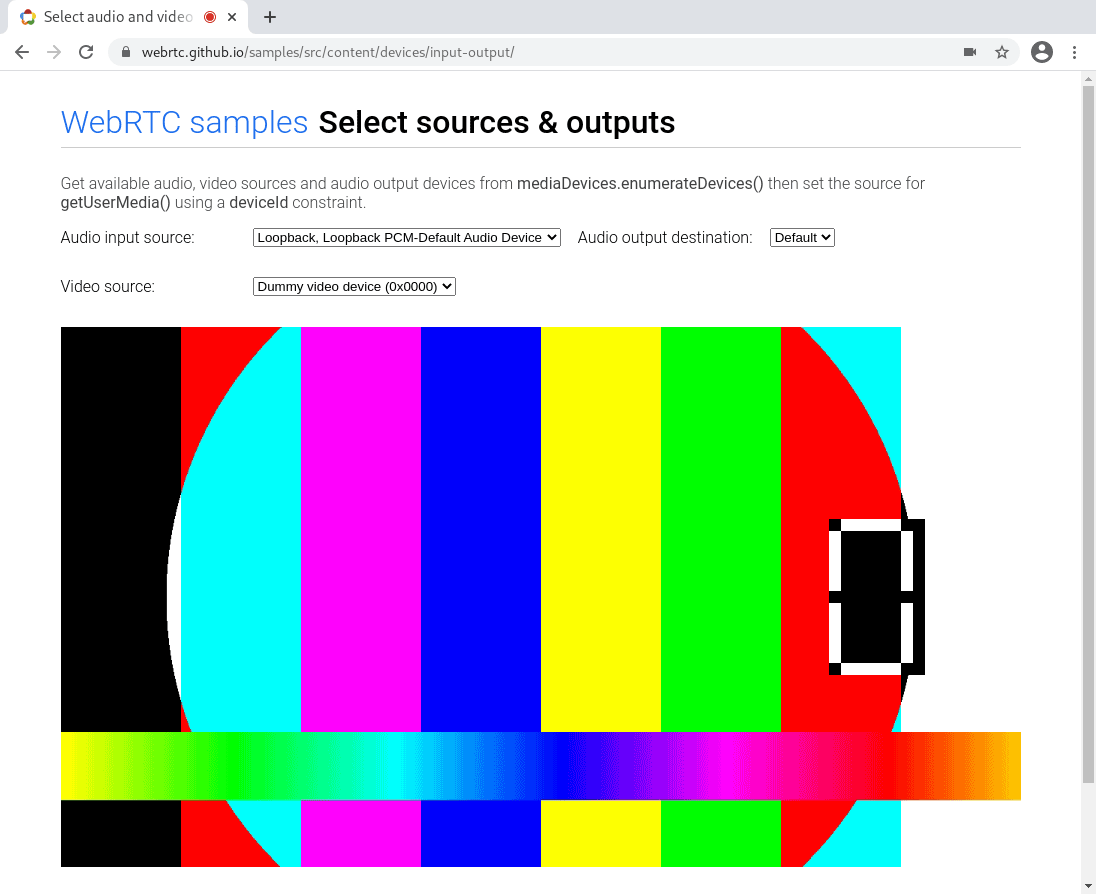
That’s most of the configuration out of the way for now. If you have a browser installed, you can navigate to this test page to confirm everything is working as expected. The video device should remain in the source list even when nothing is writing to it.
Moving on to the code now. You’ll need Node.js to run it, along with a few dependencies from npm:
$ npm install discord.js@^11.6.4 puppeteer@^8.0.0
Installing Puppeteer should also download a compatible version of Chromium. If you run into issues with missing libraries when trying to run the bot, make sure you have all the browser dependencies installed on your system.
const Discord = require('discord.js');
const puppeteer = require('puppeteer');
const child_process = require('child_process');

const client = new Discord.Client();
const config = {
    token: process.env.TOKEN,
    serverId: process.env.SERVER_ID,
    textChannelID: process.env.TEXT_CHANNEL_ID,
    voiceChannelID: process.env.VOICE_CHANNEL_ID,
};

let player = null;
There are a few different ways to get a token from a user account – one of which is to open Developer Tools (Ctrl+Shift+I) to the Network tab, change the filter to XHR and then switch channels in Discord until at least one request appears in the table. Click it, then switch to the ‘Headers’ tab and scroll until you see the ‘authorization’ request header. The value will be your token.
As for the server and text/voice channel IDs, simply right-click each of these in Discord and select ‘Copy ID’ from the context menu. You’ll need to enable Developer Mode first (in User Settings > Advanced) for this option to appear.
Now we can connect to Discord, first with the API, then the web browser:
// Sign in to Discord using the API.
await client.login(config.token);

// Open a browser to Discord web.
const browser = await puppeteer.launch({ headless: false, userDataDir: './data' });
Unfortunately, some WebRTC features don’t seem to work headlessly with either Chromium or Google Chrome, so we have to use an X server for this to work. It’s helpful to use a real one when testing locally to see what the browser is doing. When it’s time to deploy this to a server, I’d recommend using something like Xvfb instead.
We also set a persistent directory for storing data, as we want to stay signed in with all our settings on subsequent runs.
With the browser launched, we can open Discord directly to the relevant server by appending its ID to the URL. After waiting for everything to fully load, we can join the voice channel by simulating a click event:
const webClient = (await browser.pages()) [0]; // Use the default tab instead of making a new one.
await webClient.goto(`https://discord.com/channels/${config.serverId}`, { waitUntil: 'networkidle0' });

// Attempt to join the voice channel.
const voiceChannelSelector = `a[data-list-item-id="channels___${config.voiceChannelID}"]`;

await webClient.waitForSelector(voiceChannelSelector, { timeout: 0 });
await webClient.evaluate(v => document.querySelector(v).click(), voiceChannelSelector);

client.on('message', handleCommands);
Note that we have to join the voice channel from the web side, otherwise it’ll complain about being connected from another client. This is rather unfortunate since it captures from the microphone in mono, while voice from discord.js would’ve been in stereo.
We’re about ready to start playing videos now. Everything from this point on will be inside the handleCommands function.
Let’s start with a few restrictions on where the bot can be used – feel free to remove or adapt these to your liking:
// Only accept commands from a specific channel.
if (msg.channel.id !== config.textChannelID)
    return;

// Require users to be in the same voice channel as us.
if (msg.member.voiceChannelID !== config.voiceChannelID)
    return;
We should also have a “.stop” command, which immediately ends the currently playing video:
if (msg.content === '.stop' && player !== null)
{
    // Stop the current video.
    try {
        process.kill(player.pid, 'SIGTERM');
        await msg.delete();
    } catch (e) {}

    return;
}
Since the actual video playback will be handled outside of the Node process, we only need to send a termination signal to that process, then delete the command message. There’s a bit more to this later on, so keep an eye out for that.
Next, we check if this is a ‘play video’ command. These messages must start with .v, followed by a space, then a URL:
// Check if this is a video command message.
const command = msg.content.split(' ');

if (command[0] !== '.v' || command.length < 2)
    return;

// Handle non-embedding URLs.
let url = command[1];

if (url.startsWith('<') && url.endsWith('>'))
    url = url.substr(1, url.length - 2);

// Remove the message so we don't clutter up the channel.
try { await msg.delete(); } catch (e) {}
You should definitely add a few more sanity checks here to make sure the URL is valid before continuing.
We won’t be able to write to either loopback device if they’re already being written to, so make sure to stop the playback process if it’s running, but with a different signal so we can differentiate between the ‘.stop’ command and this case:
// If a video is currently playing, stop it.
if (player !== null)
    try { process.kill(player.pid, 'SIGINT'); } catch (e) {}
Perhaps slightly pre-emptive, as we haven’t started playback yet, but let’s turn the camera on now to indicate that something is happening. Nothing new here, just simulating a click event on the ‘Video’ button:
await webClient.evaluate(() => {
    const enableVideoButton = document.querySelector('button[aria-label="Turn On Camera"]');
    const disableVideoButton = document.querySelector('button[aria-label="Turn Off Camera"]');

    if (disableVideoButton !== null)
        return;

    if (enableVideoButton !== null)
        return enableVideoButton.click();
});
At long last, we can start playback:
player = child_process.spawn('./playvideo.sh', [url]);
To play the video, we just start a shell script and pass the URL as a parameter. I was originally going to spawn both youtube-dl and ffmpeg in Node and link the streams together manually, but this turned out to be far simpler and less error-prone.
#!/bin/bash
# usage: ./playvideo.sh url

set -e

trap 'kill $(jobs -p); exit 1' TERM
trap 'kill $(jobs -p); exit 2' INT

rm -f input && mkfifo input

youtube-dl --no-playlist "$1" -o - > input &

ffmpeg -re -i input -vf 'scale=1280:720,fps=30' -pix_fmt rgb24 -f v4l2 /dev/video0 \
                    -f alsa -ac 2 -ar 48000 -c:a pcm_s32le hw:0,1,0 &

wait $!
The shell script starts youtube-dl with the URL passed from Node. The contents get streamed to the ‘input’ named pipe. It then launches ffmpeg, which reads from the pipe and starts writing audio and video to the loopback devices.
(Admittedly, piping from youtube-dl directly to ffmpeg should work just as well. I previously had issues with the traps not firing, or getting wrong exit codes when I tried it this way, but I’m no shell scripting expert.)
The traps on the SIGINT and SIGTERM signals are responsible for setting the exit code of the script. This allows us to determine if the video either: played to the end (0), was interrupted by the .stop command (1), or was interrupted by another video about to start playing (2) – which brings us to the final segment:
player.on('close', async (code) => {
    // A new video is about to start -- keep the camera active.
    if (code === 2)
        return;

    // Regular exit or termination -- turn the camera off.
    await webClient.evaluate(() => {
        const disableVideoButton = document.querySelector('button[aria-label="Turn Off Camera"]');

        if (disableVideoButton !== null)
            return disableVideoButton.click();
    });
});
And with that, we’re just about ready to fire this thing up!
If, for some reason, you’ve decided to follow along with this, make sure to use a real X server for the first run, as you’ll need to log in to Discord and grant access to the camera and microphone devices when prompted.
I’d also recommend lowering the voice sensitivity slider to the minimum, and also switching off the ‘Echo Cancellation’, ‘Noise Reduction’ and ‘Automatic Gain Control’ options in the audio settings tab, since these options are primarily designed for voice and not music. You might also need to give the ‘bot’ user permission to use voice activation in push-to-talk only channels.
Here’s a not-so-great demo of the bot playing a video from YouTube and a livestream from Twitch:
Of course, there’s still a lot of room for improvement. Using Puppeteer for this is a bit overkill. This was just a quick project, but if you wanted to take it to the next level, perhaps it’d be worth doing all the WebRTC audio & video stuff without the browser.