This post will cover the initial installation of GitLab Community Edition, configuring Windows & Linux-based job runners and finally, using the built-in continuous integration feature of GitLab to automatically build your project. Sounds like a lot of work but you’d be surprised at how simple the entire process is.
Before we start, make sure you have the following..
Linux server to host GitLab instance. GitLab recommends having at least 4GB RAM but the more the merrier. You’ll also need to be running a relatively modern (3.10 or higher) 64-bit kernel as per Docker requirements.
Linux server to act as a job runner. This is optional since you could use the GitLab server as a job runner, or skip it entirely if you don’t plan on building any projects that run on Linux.
Windows server to act as a job runner. This is optional if you don’t plan on building any projects that run on Windows, or if you prefer to use cross-compiling.
Basic Git knowledge. If you can clone, commit and push a few files then you’re good to go.
First things first, let’s get GitLab up and running. We’ll be using the provided Docker images which I’ve found to be the most straightforward method for installing but you’re free to compile from source or use the omnibus packages for your distribution if you prefer. I’ll be using a virtual machine running Ubuntu Server 16.0.4 LTS for the GitLab host, which means the first step is to install Docker from the official repository – this will be a little different if you’re using another distribution.
curl -s https://download.docker.com/linux/ubuntu/gpg | sudo apt-key add -
sudo add-apt-repository "deb [arch=amd64] https://download.docker.com/linux/ubuntu $(lsb_release -cs) stable"
sudo apt-get update && sudo apt-get install -y docker-ce
Before pulling in the GitLab image we need to check for port collisions. By default, GitLab will listen on ports 22, 80 and 443.
If your existing SSH server is currently occupying port 22, then now is a good time to switch to a non-standard port and let GitLab use port 22 instead. Alternatively, make the needed adjustments to the ‘publish’ arguments in the next command – the port on the left of each argument is the host port while the right is the container port, so only change the left value.
sudo docker run --detach \
  --hostname koumakan.localdomain \
  --publish 443:443 --publish 80:80 --publish 22:22 \
  --name gitlab \
  --restart always \
  --volume /srv/gitlab/config:/etc/gitlab \
  --volume /srv/gitlab/logs:/var/log/gitlab \
  --volume /srv/gitlab/data:/var/opt/gitlab \
  gitlab/gitlab-ce:latest
For convenience, I’m using the virtual host “koumakan.localdomain” which I’ve added to the hosts file on my local computer.
Docker will now start to pull in the missing images before starting the GitLab container. You can periodically check its status by running ‘sudo docker ps’. When the status of the container changes to ‘Up (healthy)’ it’s time to move on to the next step.
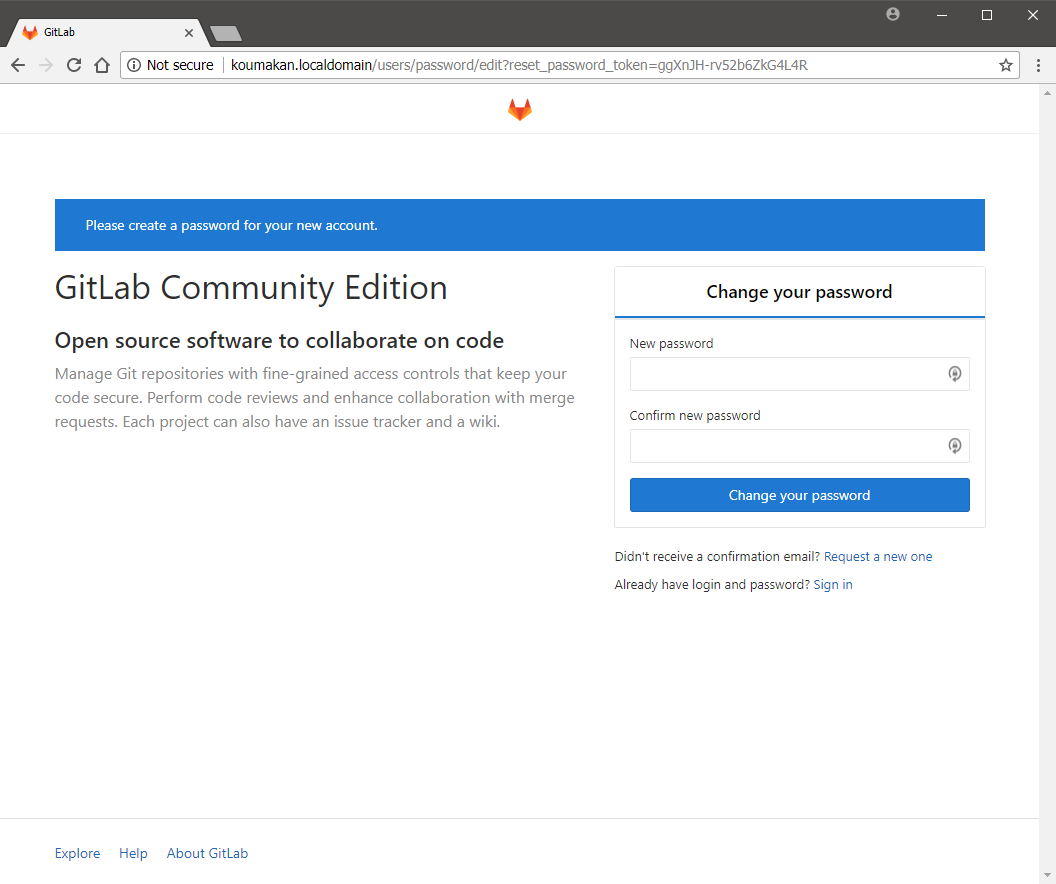 Setting the root account password for the first time.
Open up your web browser and navigate to your GitLab server – in my case, koumakan.localdomain. You should be greeted with the first time setup page where you can set the password of the ‘root’ user account. Do this, then log in with the username ‘root’ and the password you just set.
That’s it for setting up GitLab – yeah, it’s literally just one command, it’ll even start automatically with your server assuming you didn’t remove the “–restart always” argument.
If you’re new to GitLab, take some time to familiarise yourself with the interface. Before we move on to setting up job runners, you’ll need to add an SSH key to your account, create a project and push to it. If you’re already familiar with other Git hosting sites like GitHub or Bitbucket this should be pretty straightforward.
Setting up a Windows job runner
Let’s get started with setting up our first job runner.
The first order of business is picking an operating system. Ultimately, this comes down to your personal preference. You could use something more server oriented like Windows Server 2016, or something desktop-oriented like Windows 10. It really doesn’t matter as long as you know your toolchain of choice will work on the operating system you’ve chosen.
That said, I’ll be using Windows Server 2008 R2 since it was the first ISO file that came up on my computer when searching for ‘windows server’. I’ve ran through a clean installation of the Standard edition in a virtual machine, adding an entry for “koumakan.localdomain” in the hosts file pointing back to the GitLab server along the way.
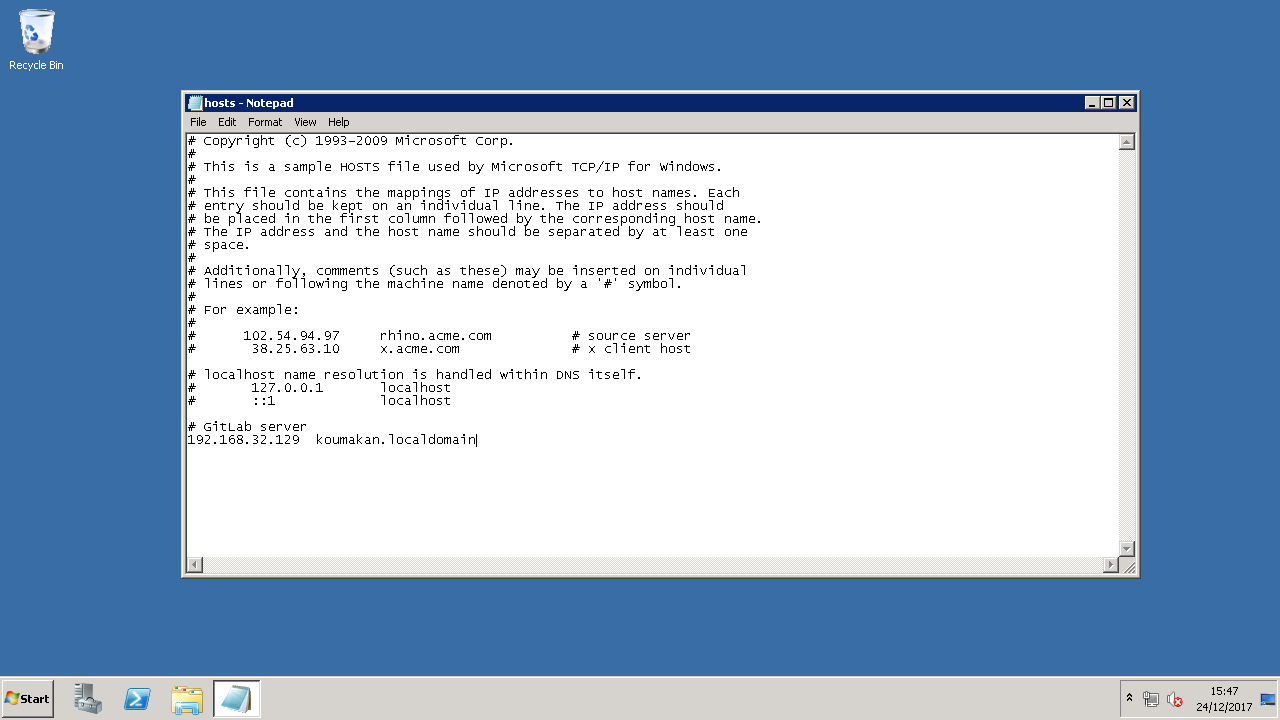 Now all future requests to ‘koumakan.localdomain’ will point to ‘192.168.32.129’.
Now it’s time to install anything that might be needed to build our project. As far as essentials go, make sure you don’t forget about installing Git for Windows. Basically, as long as you can open a command prompt and run “git” without getting a ‘..is not recognised..’ error then you’re good to go.
In my case, the only software I needed to install was the free Visual Studio 2017 Community Edition which includes Git for Windows as an optional feature. I’ve included a screenshot below of the features from my initial installation. This is a minimal configuration which should be just enough to build basic C++ projects. Feel free to change it as you see fit.
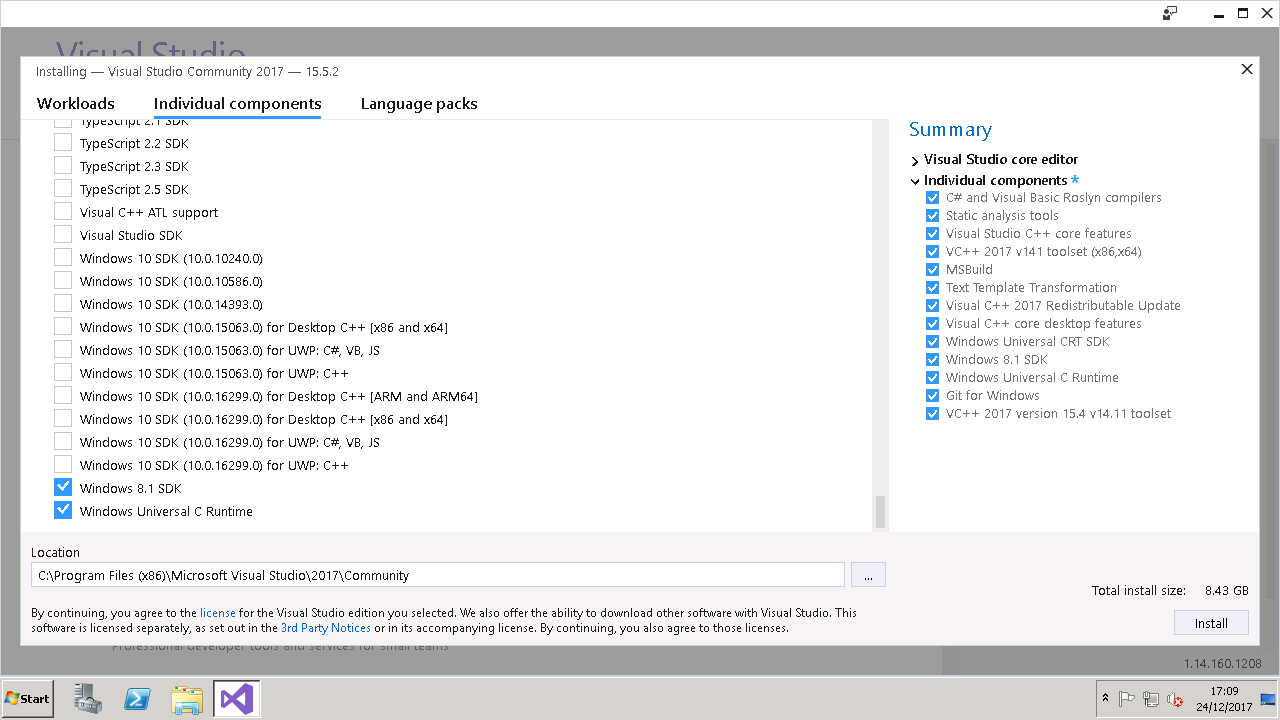 Just enough to build the project.
Once that’s all finished, it’s time to install the GitLab Runner service.
There’s a more comprehensive guide over at the official website so I’ll be brief. Download either the 32-bit or 64-bit GitLab Runner executable, rename it to gitlab-runner.exe and place it in C:\GitLab-Runner. Then, open a Command Prompt window as Administrator, change directory to C:\GitLab-Runner and run the following commands.
gitlab-runner install
gitlab-runner start
This will install GitLab Runner as a system service that will start up with the server. Finally, register with the GitLab server.
gitlab-runner register
You’ll be prompted to specify the following: a URL of the GitLab instance, a token which you’ll find in the ‘Admin Area > Runners’ page, the name of the GitLab Runner and a few questions about which jobs the runner should handle.
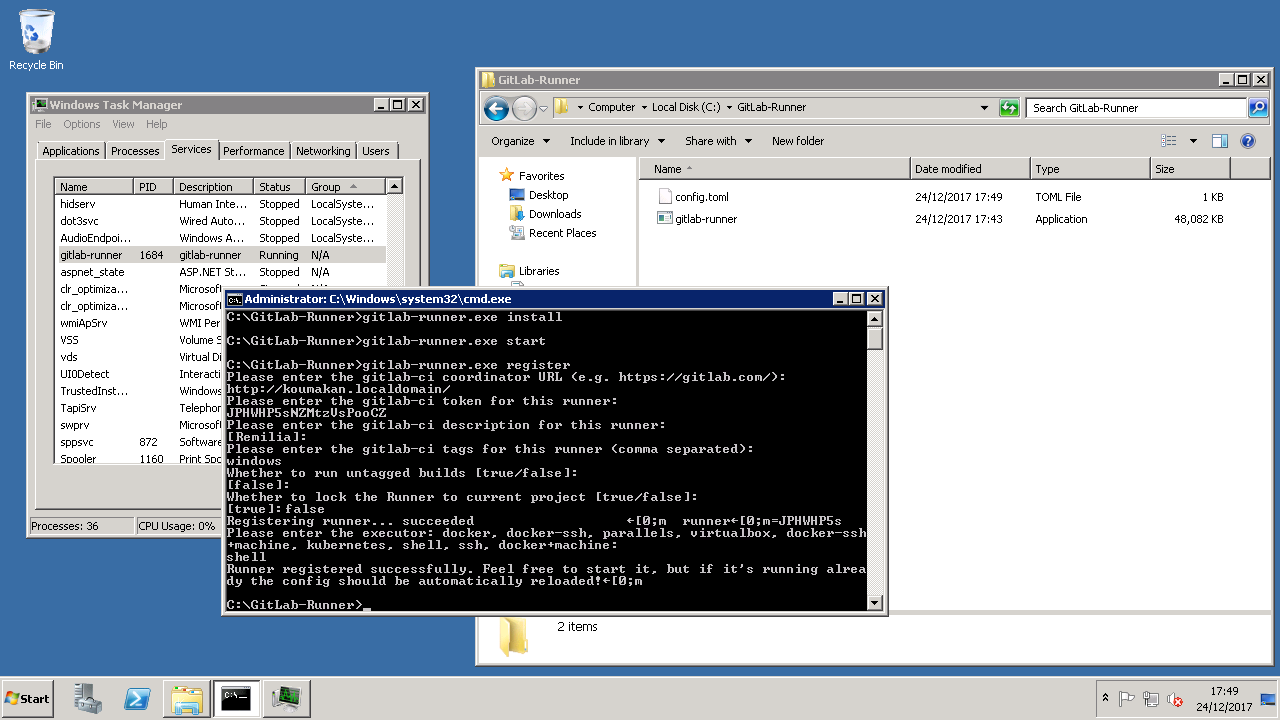 Registering with the GitLab CI coordinator on Windows.
 Ready to go.
Since this is a Windows server, I gave it the “windows” tag and set it to only handle jobs with that tag. When prompted about which executor to use I chose “shell”. Perhaps this a bit questionable in terms of security, but I’m operating under the assumption that this server is only for your use, so it shouldn’t be an issue.
Assuming all went well, that’s all for the Windows runner!
Setting up a Linux job runner
Once again, I’ll be using a virtual machine with a clean install of Ubuntu 16.0.4. If you don’t have a spare server to act as a job runner then you’re free to use the same server that’s currently hosting GitLab.
Unlike our Windows-based runner, we’ll be using Docker as the executor here, meaning each job will run in its own container. That means (unless you’re using the GitLab server) you’ll need to install Docker again. Same instructions as before.
Once that’s done, it’s time to install the GitLab Runner. This time it’s even easier.
curl -L https://packages.gitlab.com/install/repositories/runner/gitlab-runner/script.deb.sh | sudo bash
sudo apt-get install gitlab-runner
If you’re installing this on a new server then you might need to update the hosts file first.
echo "192.168.32.129 koumakan.localdomain" | sudo tee -a /etc/hosts
Now run through the registration process. Same as before, except now using the “linux” tag and “docker” as the executor.
 Registering the runner on Linux.
You’ll also be prompted to specify the default Docker image. I mainly do my development work on Arch Linux so I chose ‘archlinux/base:latest’ but there’s plenty to choose from.
Since we’re using the Docker executor now, we’ll need to add an additional setting to the GitLab Runner configuration file. To do this, simply add the following under the “[runners.docker]” line in /etc/gitlab-runner/config.toml.
extra_hosts = ["koumakan.localdomain:192.168.32.129"]
With that, you’re done! Depending on your operating system you might also need to enable the GitLab Runner service.
sudo systemctl enable gitlab-runner.service
In my case, Ubuntu did this for me and the service automatically started up on the next boot.
Writing a GitLab CI file for Windows
Just like that, we’re ready to start writing our first GitLab CI file! I’ll start off with a Windows project, specifically we’ll be using the example code from my last post on using the Steam overlay for rendering.
To begin, we’ll need to prepare the environment by calling the “vcvars32.bat” script. This’ll pull in some additional variables which are required to build our project on the command line.
before_script:
  - 'call "%ProgramFiles(x86)%\Microsoft Visual Studio\2017\Community\VC\Auxiliary\Build\vcvars32.bat" x86'
Next, we’ll define our build stage.
build:
  stage: build
  tags:
    - windows
  script:
    - msbuild.exe gameoverlayrenderer_imgui_dx9.sln /m /p:Configuration=Release /p:PlatformToolset=v141
  artifacts:
    paths:
      - bin/Release/gameoverlayrenderer_imgui_dx9.dll
We use the ‘windows’ tag to ensure that the job will only run on the Windows-based runner we previously registered.
As for the script, it’s a simple one liner which builds the solution in the ‘Release’ configuration. Since I originally created the project using Visual Studio 2015, I’m manually setting the toolkit to the one provided by Visual Studio 2017 here to avoid potential errors – of course, you could just install the older toolkit but this works just as well.
Finally, the ‘artifacts’ section is used to specify a list of files to save from the successful job. These will be available for download after the job completes. For this project, we only care about the gameoverlayrenderer_imgui_dx9.dll file.
Now we just have to combine this into a single file, save it as .gitlab-ci.yml in the root directory of the repository, commit it to Git and finally, push it up to our GitLab server. The compilation just should start immediately afterwards.
 That’s always a good sign.
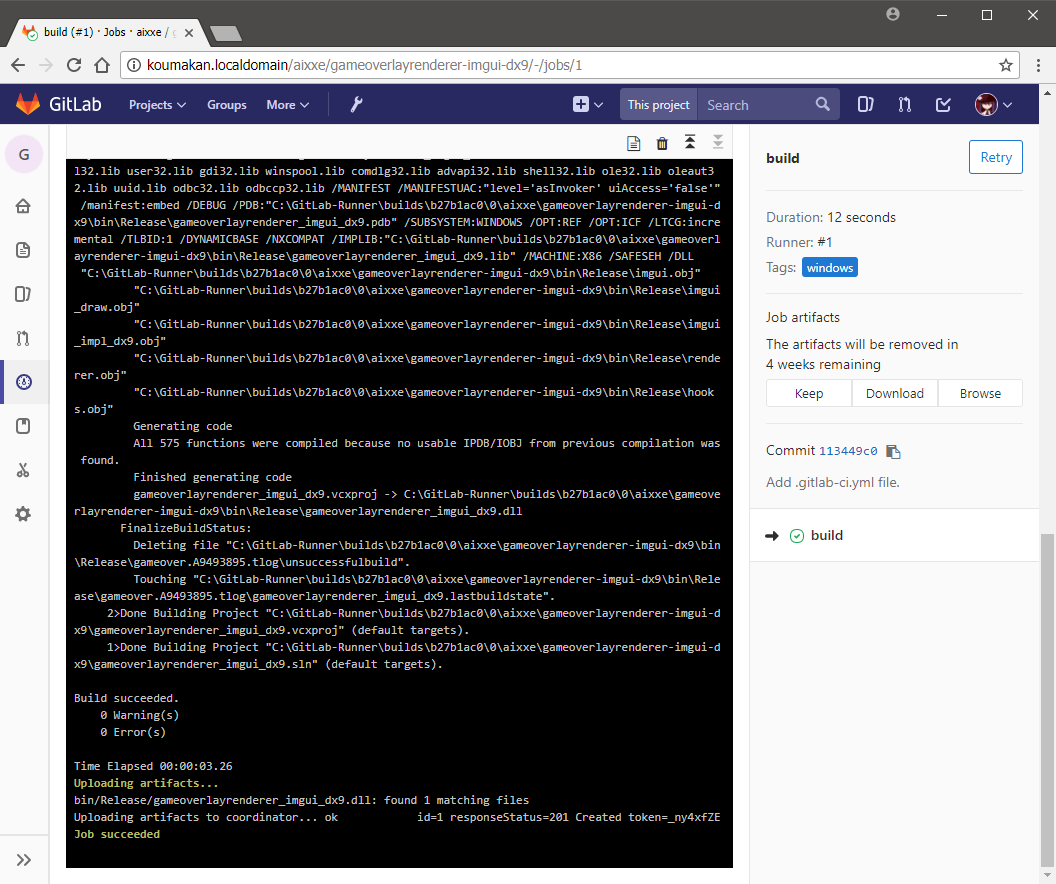 The log will automatically update for longer running jobs.
If all went well, you should see something along the lines of the above screenshot. On the other hand, if anything went awry it should be easy enough to track it down with the provided logs, then either make changes to the .gitlab-ci.yml file or manually re-trigger the build by clicking the ‘Retry’ button in the top-right.
Writing a GitLab CI file for Linux
Now for a Linux project! cstrike-basehook-linux, a 32-bit project base for Counter-Strike: Source. I’ve no idea if this thing still works since I’m no longer using Linux on my desktop but hey, it should at least build without an issue.
For the build image I’ll be using Ubuntu 17.10 (Artful Aardvark) since it includes GCC 7 in the repositories by default.
We’ll need to pull in the multi-lib version of GCC along with the 32-bit SDL2 libraries and headers.
before_script:
  - dpkg --add-architecture i386
  - apt-get update
  - apt-get install -y build-essential cmake g++-multilib libsdl2-dev:i386
That should handle the dependencies. The build stage is very simple here, the only thing new is where we specify the Docker image “ubuntu:artful” to be used. Other than that, a simple ‘cmake . && make’ is enough to compile the project. Finally, the libcstrike-basehook.so file will be uploaded as a build artifact.
build:
  stage: build
  image: ubuntu:artful
  tags:
    - linux
  script:
    - cmake .
    - make
  artifacts:
    paths:
      - libcstrike-basehook.so
Once again, save as .gitlab-ci.yml, commit, push and browse over to the ‘CI / CD > Jobs’ page.
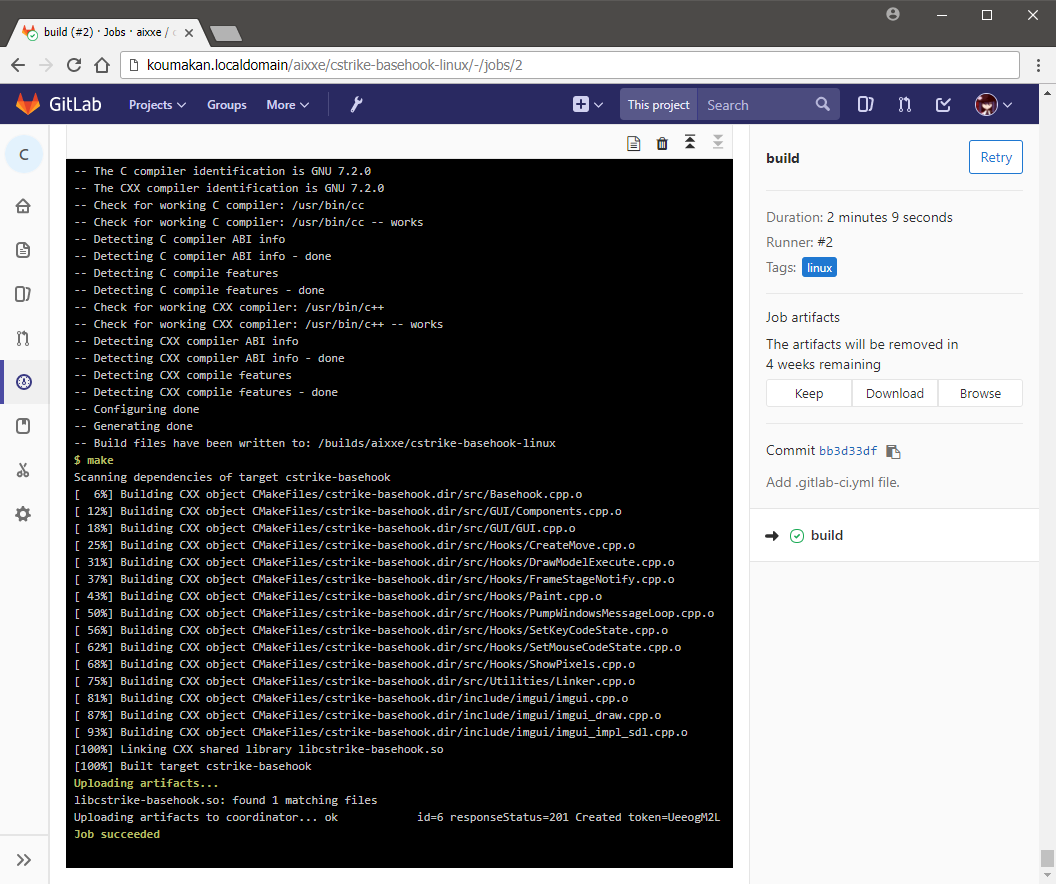 All good on the Linux side too.
And that’s all for now! Hope you enjoyed the brief introduction to GitLab and its continuous integration functionality. I’m planning on writing a follow up post in the future with some additional tasks such as: using CI related variables in your projects, patching in dynamic version information, stripping out debug information and uploading the final file to a remote server.
Until next time, have a Merry Christmas and a Happy New Year!